Friday, 23 December 2016

More head lining 3

The next phase of the head lining project is to finish off in the aft cabin I had already covered the sides of the coach roof and the under deck panels just leaving the roof to do. The first job was to cut out and stick the laminate panels on the inside of the forward bulkhead these were roughly shaped using a cardboard pattern and then finally trimmed and fitted in place with Evostick contact adhesive it can be a bit messy spreading the stuff on vertical surfaces the panel itself was easy just a matter of laying it flat pouring the stuff on and spreading it out.


Fitting the ply panel

The ply panel was roughed out using the cardboard pattern before being trimmed and fitted again using timber to hold it up. Once the panel fitted in a satisfactory manner it was taken home to have the lining carpet glued on.


Reverse side of panel with carpet glued on

The above photograph shows the reverse side before the edge had been folded back and glued down. Over the weekend I had sanded and varnished the timber trim ready to be installed.


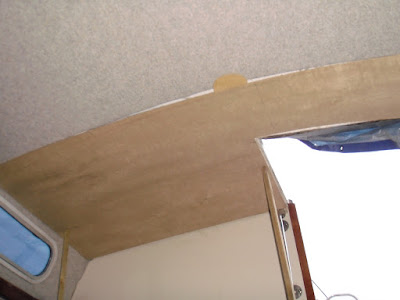
Roof panel in place

I have put some of the timber trim in place but unfortunately I am short of the correct length screws as the carpet is thicker than the original vinyl lining I need longer screws these are raised head countersunk self tappers which I have ordered but I expect that they are strike bound in a post office somewhere these will also be needed to complete the saloon timber trim. That is just about it for the head lining only the quarter berth left to do. The original locker front panels for the aft cabin are in pretty poor shape the glued on veneer is peeling off in places but the previous owner had cut out some new ply panels for this purpose which I have more or less decided to use instead of refurbishing the old ones the thought at the moment is to cover them with some more of the van lining carpet probably in a darker shade than the head lining watch this space. 


Friday, 9 December 2016

More head lining 2

The head lining is progressing at a satisfying rate I have now more or less finished the saloon it just needs the timber trim pieces sanding and varnishing I have identified most of them so that task will be this weekends homework project. The method has been the same as for the fore cabin so I will not bore you with another description but will show the photographs.


Fitting the forward panel in the saloon


Trial fitting of the aft ply panel

The round piece of ply to the left of the photograph is a temporary support for the forward panel. Because of the shape of the saloon, a lot wider than it is long its a bit difficult to get a good photograph of the whole head lining.


Fitting the aft panel

As with the forward panel it was necessary to use timber props to support the panel the aft panel is much more floppy than the forward one due to the cut out for the companion way. The join between the two panels is a bit more obvious in reality as the two panels naturally bend by different amounts once I have all the timber trim in place, which also supports the panels, I will possibly make a cover strip to go over the join. The the panels are secured to the timber roof stiffeners, which are glassed into the structure, with stainless steel cups and screws.


Monday, 5 December 2016

Wednesday, 23 November 2016

Head lining progress

Over the last weekend at home I carried on with lining the ply head lining panels as this was a clean operation I got to do it indoors in the warm, using the ply panels as a template I marked out the material using some dressmakers/tailors chalk, which my wife offered, I allowed a 50mm border to fold around the edge of the panel.


Aft cabin panel


Overlap marked with tailors chalk

Once the material had been cut out it and the ply was sprayed with the Trimfix adhesive, this operation was obviously not carried out indoors, and put aside for a few minutes to dry. Once dry the material was layed face down on a level surface, the conservatory floor, and the ply panel placed in the correct position and pressed down all over. As Trimfix is a contact adhesive I had marked a couple of points on the material which would coincide with the corners of the ply panel to help get the panel in the correct position as you only get one shot with the Trimfix it bonds instantly.


Panel bonded to the material

I then applied Trimfix around the back edge of the ply panel and folded the material over and pressed it down.


Completed aft cabin panel


Completed fore cabin roof panel

The carpet stretches easily around most of the curves encountered but a couple of vee cut outs were required on the more tightly curved corners on the fore cabin roof panel.

So far I have completed most of the fore cabin head lining it just needs the two small panels which fit under the side decks I thought that I had found the ply panels but on checking today they don't seem to fit but I cannot find anywhere else where they might fit needs some further investigation, the aft cabin panel which fits under the aft deck is now in place together with the saloon coach roof side lining.


Fore cabin


Saloon

I have identified and checked the fit of the panels which fit under the side decks in the aft cabin these will be lined  along with the coach roof sides in the aft cabin as the next phase of the job after which I need to make some new ply panels for the saloon and aft cabin deck heads the salon will be a bit tricky due to its size making the panel a bit floppy to deal with. So far I am quite pleased with the way this job has gone I have never done this before so it was started with some trepidation I think having the overhead lining on ply panels makes the job much easier than trying to stick the lining directly onto the roof particularly in the larger areas and working single handed its much easier to lay the material face down on a flat surface and place the panel onto it.

As an aside I went down to the boatyard on Sunday morning to find that storm Angus had shredded the tarpaulin cover, it was on its last legs and well worn when I was given it, several spares came with the boat. However the associated rain did show up a leak where the mushroom vent is secured to the fore hatch, I have recently resealed the hatch glazing but never gave a thought to the vent and so the vent will need to be removed and resealed.  


Friday, 18 November 2016

Internal work

Now that the weather is getting colder its time to move to inside work the next major task is to get to grips with the headlining. The original headlining was as far as I can gather the ubiquitous foam backed vinyl glued onto thin ply panels. I have been thinking about the replacement materials for some time and over the last week or two I have given it some more serious thought and decided to use van lining carpet for a number of reasons namely, I think that the carpet will give a warmer feel, it will give a degree of sound deadening, after a while the foam backing on the vinyl crumbles away probably not too important at my time of life and finally price as far as I can make out its about half the price of the vinyl although I will probably use vinyl for the heads in view of a shower being installed. I now have the carpet its stone coloured 'Veltrim' from Harrison Trim Supplies www.harrisonstrimsupplies.co.uk together with sufficient 'Trimfix' adhesive for the job.

Before starting on the head lining I needed to fit the laminate panels to the aft saloon bulkhead I cut out a rough cardboard template and then used this to mark out the panels which once the bulkhead had been cleaned up they were glued in position with Evostick contact adhesive


Port side


Starboard side

The port side panel is L shaped to allow a box to be built around the rear of the cockpit instruments this will be finalised when I have chosen the chart plotter so that I can give it sufficient depth. Now that these panels have been fitted I have fully secured the companionway steps with all the bolts being sealed one of the bolt holes was a persistent source of rain water, leaking in hopefully they are now all watertight I expect that there will be some rain along soon to test them.

My recent homework job was to clean up the surviving ply panels for the headlining and to check that they are suitable for reuse. I found that the easiest way to get rid of the old dried out foam was to lay them on the ground and give them a good going over with a stiff yard broom I am afraid that it does not do much for the old adhesive though they will need a good sanding to remove that. It looks as though the Marine Projects employee who made the panels has left his mark on all the surviving panels it's a bit feint, drawn in pencil. but you can just make out the face in the lower photograph below it is also in red on the starboard aft saloon bulkhead but unfortunately I did not have the camera handy at the time I covered it up. 


Fore cabin deck head panel


Makers mark

I also spent some time identifying and varnishing some more of the timber trim which can be replaced once the headlining has been replaced there is still quite a bit more of this to do


Timber trim for the headlining

Finally I have started to cut out some of the headlining carpet for the sides of the coach roof in the saloon and fore cabin I decided to cut out the window frame profile and then stick the carpet around the window on reflection I think it would have been easier to glue the carpet to the sides of the coach roof with the windows out and then trim round the opening but after having spent a good deal of time and effort getting the windows watertight I was very reluctant to remove them again.


Carpet panel for saloon coach roof side

I have been trial fitting some of the carpet panels and I find that it goes round corners very easily even when it is required to bend in two directions probably more flexible than the foam backed vinyl. Harrisons can supply an even more flexible lining it goes under the name of 'Easytrim'. These materials are designed to moulded round vehicle wheel arches etc also 'Veltrim' has a flammability type approval for which is the normal requirement for materials used in coach building and for those of you who are interested it is 100% recyclable polypropylene fibre and it comes in 2 metre wide rolls.


Friday, 4 November 2016

More glazing

Started the week by fitting the starboard saloon window back into place all went well it took a fair amount of effort to pull it into the curve of the coach roof starting with the screws in the centre and gradually working out to the ends.


Port saloon window


Starboard saloon window

I then removed the opening part of the fore hatch the acrylic glazing had been 'glued' in with some form of black mastic but the glazing had started to lift letting in rain water there was some minor crazing to the glazing but as it is 10mm thick I decided that I would reuse it. The glazing came out of the frame with very little effort after cutting round the edge of the acrylic with a Stanley knife and then gently levering it out with a thin scraper. I cleaned up the acrylic panel and the aluminium frame with an acrylic scraper and Detak which is basically chewing gum remover  but seemed to be quite effective at removing mastic I then washed the frame and glazing with hot water and detergent and left them to dry thoroughly. Before fitting the glazing I ran masking tape around the edge on the upper side to make the final clean up easier, finally I gave the glazing and frame a wipe over with methylated spirit to remove all traces of grease and put them aside to dry. While the frame was drying I removed the remains of the steel roll pin that had retained one of the locking screws and also the brass pin on the other locking screw and replaced them with some 1/8" stainless steel pins. 


Glazing cleaned up and ready for fitting

Once everything was dry I ran some EHB5321 double sided tape around the frame, EHB extra high bond or really really sticky tape, this is a transparent acrylic foam tape. This tape is a little tricky to use it is important not to stretch it so I left the red backing tape in place  but this needs to be removed to bend the tape round the corners the ends of the tape were then tightly mitred together.


Applying the double sided tape

The glazing was then pressed into place and clamped up for 24 hours.


Glazing clamped up

After 24 hours had passed I removed the clamps and squeezed some mastic into the gap between the edge of the glazing and the frame before removing the masking tape.


Removing the masking tape


Complete and ready to refit

The hatch was reassembled today which hopefully will mean all the glazing is now watertight there was some heavy rain later this afternoon so it should have been tested I will probably go and have a look tomorrow. Again all the advice and materials for the work to the hatch came from Hadlow Marine. 

Also this week I have carried out some minor fibreglass repairs to the flanges that support the wood trim around both companionways the wood trim was then replaced on the main companionway and then the stainless steel retaining bars for the wash boards were permanently screwed into place.


Sunday, 30 October 2016

Windows

I have now got the saloon windows stripped and resealed the port side one was refitted last Monday.

Last week was a short week as I had a days sailing with a friend on Friday moving his new boat from Medway Yacht Club round to Conyer. It was a pleasant days sailing, warm for the time of year, albeit an early start, up at 04.00 over to Conyer to leave my car there and then on to Lower Upnor to pick up the boat. We got away just after 07.00 and arrived in Conyer just on the high water at midday. There was not a lot of wind about so it was a case of motor sailing all the way in order to arrive in time to get up the creek to Swale Marina.

Anyway back to windows I went over to Queenborough yesterday morning and removed the starboard saloon window and stripped it and cleaned out all the old mastic from the flange photograph shows port side window starboard side was similar.


Saloon window with old mastic and bedding tape removed

The screws holding the two parts of the frame together were then removed and the two parts were gently prised apart using a sharp wood chisel by inserting it into the joint and gently twisting once the bond had broken it was just a matter of carefully pulling the two halves apart.


Screws holding the frame together

Once the frames had been split and the glazing removed, these are toughened glass unlike the fore and aft cabin windows, it was just a matter of removing the old mastic seals. I cleaned everything up with white spirit and then followed up with a good wash with hot water and detergent, Once everything had been thoroughly dried I put a good fillet of Arbosil 1098 into the channel of the lower half of the frame.


Lower half of frame with Arbosil 1098 fillet

To hold the glass central in the channel I used some short pieces of rubber channel, approximately 1/4" long, which were put over the glass before it was pressed into position in the channel. The workbench is an old wooden box and the gap between the boards is just right for holding the frame upright.


Short pieces of rubber channel attached to the glass


Glass pressed into position

Once the glass was in place I added some more pieces of rubber channel to the top half of the glass before putting a fillet of Arbosil 1098 into the channel on the top half of the frame and then pressing it into place. Once the top half of the frame was in position I replaced the fixing screws. This was followed up by an inspection to make sure that the mastic was evenly squeezed out on both sides of the channel where this had not happened it was just a matter of running the mastic gun along those areas and squeezing some more into the channel I then did a quick preliminary clean up by running a sharp wood chisel around the frame to remove the majority of the mastic that had been squeezed out. After lunch I gave the frames a wipe round with white spirit to remove any mastic, once that had been done I left the window to allow the mastic to cure.
Cleaning up with a wood chisel works fine for glass but on the other windows which have acrylic glazing I used a soft plastic scraper and then white spirit and a rag to clean them up.


Starboard window completed

The starboard window will be refitted tomorrow all that will be required will be some rain to test them that only leaves the fore hatch the acrylic glazing is OK but it is coming away from the frame which will require it to be removed and resecured using an extremely sticky double sided tape that will be the next homework job.


Friday, 21 October 2016

Bit of a milestone

I reached a bit of a milestone this week, and in theory the boat should now float as I have filled all the holes below the waterline. I started the week by sanding the new GRP on the skeg repairs and redundant hull openings and then adding an epoxy fairing compound, a mixture of epoxy and West 407 lightweight fairing filler, which was then left to cure.


Fairing compound applied

Once the fairing compound had cured I sanded it down, the sanding was done free hand but I used a flexible batten laid around the curve of the hull to check the profile.


Fairing compound after sanding

After sanding there were a couple of small areas that needed a further application of the fairing compound where the heads seacock and log openings had been made good.

Finally the last holes below the water line were filled when I fitted the new hull anode there is still some work to be done below the waterline before she can go back in the water, the rust needs to be removed from the keel so that the bottom can be anti fouled and the propeller still needs to be fitted.


New hull anode

To finish up with GRP work for the time being I dealt with a couple of persistent rainwater leaks the hull to deck joint. On the Moody 33 the deck is joined to the hull with pop rivets the join is subsequently glassed over but in a couple of places around the bolts that retain the toe rail there were a couple of annoying leaks. I had tried putting penny washers and Sikaflex sealant under the nuts to no avail and in further investigation found a couple of areas where the glass fibre mat had not been properly wetted out allowing water to leak through. I cut back to sound GRP with a sharp wood chisel and then made good with some glass mat and epoxy resin.

Finally to finish up today I removed the port side saloon window for refurbishment there had been a leak I think between the frame and the coach roof side but while it is out I will reseal the glass into the frame at some time it has been patched up with silicone sealant this will be this weekends homework project. Once the port window has been replaced I will refurbish the starboard one, it doesn't leak at the moment but the seal between the glass and frame is hard and showing some signs of cracking. It is inevitable that once the boat is back in the water and sailing there will be some flexing of the hull which will cause the window to leak.