Friday 27 May 2016

More engine work

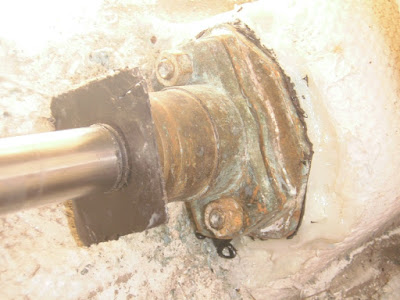
On Monday morning I rigged a timber beam across the cockpit benches and using a pull lift I managed to just lift the engine high enough to pull the propeller shaft inboard  so as to be able to fit the stern gland then with the shaft back in place I lowered the engine back onto its mounts and connected up the flexible coupling. The stern gland still needs re-packing and the greaser connecting up unfortunately Faversham Creek chandlery had run out of 1/4" just my luck.


Stern gland  in place


Coupling re-connected 


I then gave the aft cabin a bit of a clean out and replaced the locker lids and then gave the cockpit cushions a good scrub while the sun was out to dry them.

On Wednesday I had a bit of a painting session on various bits of the engine used Hammerite special metals primer on the aluminium and other non ferrous bits including the oil cooler, oil cooler bracket and heat exchanger bracket  The primer dries quickly so I was able to get a coat of green paint on these parts this was followed by a quick shopping trip to CD Supplies to get two new flexible oil pipes made up. I then finished up the day with the last coat of varnish on the last of the locker lids.

Today I painted some more bits including the header lank, exhaust manifold and the engine fresh water pump by painting the back and bottom of each part I could then hang them on the engine and finish painting them. I got the oil cooler and the new flexible oil pipes fitted together with the pipe from the raw water pump. Once the fresh water pump was fitted I was able to adjust the position of the alternator bracket to align the two pulleys which should help to reduce wear on the alternator belt.


New flexible oil pipes


Engine almost complete

The engine is now almost complete with just the heat exchanger some pipes and hose connections to fit and then work out the exhaust arrangements I will probably fit a new plastic water lock and a new exhaust hose will be required. I have sorted most of the engine wiring just the heavy starter cables to install.


Sunday 22 May 2016

More window work

Stripped the fore cabin windows on Tuesday these are more like arrow slits than windows about 1200mm long by 75mm wide these had been sealed with a light brown coloured mastic which had stuck like the proverbial some had gone hard and some was still very soft I managed to break one of the pieces of perspex trying to get it out. Off to Hadlow on Wednesday to get the new perspex and sealing materials so didn't get to the boatyard until lunchtime which left time for another coat of varnish all round and cut out some ply to make a hatch to cover the stern gland access in the aft cabin and a door for the opening in the bulkhead between the engine space and the aft cabin.

On Thursday I reassembled the fore cabin windows ready for refitting on Friday that just leaves the saloon windows and the fore hatch to deal with the saloon windows are toughened glass so the aim is to strip and reseal and the fore hatch perspex is in good condition but needs to be re-secured to the hatch frame.


Port fore cabin window fitted


Starboard fore cabin window


After refitting the windows I got talking to another boat owner and by the time I had been back to his boat for tea most of the afternoon had gone just had time for a coat of varnish on the locker lids before going home. 

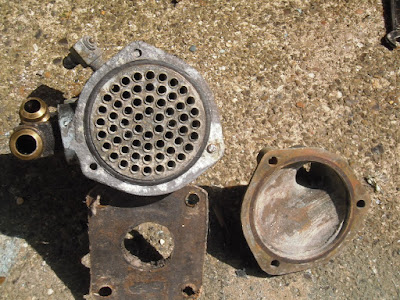
Sunday I removed the tube stack from the engine oil cooler so that I could get on with removing the sheared bolts fortunately one of them had enough left of the bolt to be able to grip it with the stillsons so after some careful heating it came out the other on had to be drilled out. The bolts are 1/4 UNC and unfortunately I didn't have a tap for cleaning up the threads so I had to resort to cutting a groove in a suitable sized bolt and running it down the thread it is usual to case harden the bolt but as the thread is in an aluminium casting it wasn't necessary.


Oil cooler ready for reassembly


The oil cooler was the reassembled with new 'O' rings from Parts 4 Engines ready for a coat of green Hammerite to match the rest of the engine. The plan is to lift the engine tomorrow and pull the propeller shaft inboard and fit the stern gland then the rest of the ancillary bits can be refitted I had left them off to keep the weight of the engine to a minimum until the stern gland has been fitted.


Oil cooler reassembled ready for painting 


Monday 16 May 2016

Windows and further engine work

There was a reasonable amount of rain on the Tuesday and on checking the aft cabin windows on Wednesday morning I was pleased to find that they hadn't let a drop through.

On Wednesday I tried to remove the propeller shaft coupling but my gear puller is a three legged one and would not fit the two bolt  coupling tried to shift it with a hammer and a wooden block but it would not budge I was tempted to try and pull it off using the engine coupling with a spacer between the two but as the shaft coupling looks like a casting decided not to risk it I will have to lift the engine and pull the shaft inboard and fit the stern gland from the other end.

On checking I found that I was a couple of locker lids short I had missed the floor hatches for the aft cabin which are the same size so I found some ply and cut out two more and gave them a first coat of varnish.

Over the weekend I made a start on some of the work required on the engine ancillaries first off was to remove a broken stud from the exhaust manifold fortunately there was enough of it left to grip with a small pair of stillsons  and after some careful heating, the manifold is cast aluminium, it came out quite easily.


Broken stud almost out


Success

The next job was to open up the engine oil cooler and clean the tubes unfortunately I managed to shear a couple of the bolts that retain the end covers the problem again the bolts had seized in the aluminium casting of the oil cooler body one of the bolts has sheared of flush with the casting so will have to be drilled out but the other has sufficient length to be possibly unscrewed with a bit of help from the propane torch. The tubes on the inlet end were quite well fouled and after cleaning I decided to leave the sheared bolts for another time.


Oil cooler sea water inlet end


After cleaning


First off today I put another coat of varnish on the locker lids before moving on to the removal of the fore cabin windows, fortunately they came out fairly easily but they had been fitted with a huge amount of silicone sealant most of which had squeezed through to the inside, in my humble opinion the only place for this stuff is in the bathroom. The perspex is badly crazed and the mastic seal in the frames has perished so there will be another trip to Hadlow to obtain the necessary bits and pieces to refurbish them.


Fore cabin windows and inner frames


Monday 9 May 2016

Windows

I reassembled the two aft cabin windows over the weekend, they went together easily although I found doing it with the Arbomast somewhat messy but maybe that was down to me. On my previous boat I rebuilt the windows but I used rubber channel for the seals it was certainly cleaner but  I had quite a bit of a struggle getting the larger saloon windows back together again. Using rubber channel seals on the Moody windows would possibly more problematic because the angled corners at the bottom of the window would make sealing more difficult, on the Bowman all four corners were rounded so that the rubber channel could be wrapped right round the glazing. After allowing the mastic to begin curing I found it easier to use a soft plastic scraper to remove the excess and then wipe over with white spirit.


Completed windows

The windows were sealed into the openings with butyl tape which leaves them easy to remove in future using Sikaflex, or similar, makes them difficult to remove without causing serious damage. The windows are secured with self tapping screws which screw through the sides of the coach roof into an inner aluminium frame it took a bit of fiddling to do single handed but by wedging pieces of timber across the coach roof I was able to get a couple of screws started and after that it was just a matter of working around the frame.


Windows in place

Please excuse the views of my feet but my camera does not have an optical view finder and when the sun is shining on the screen the picture becomes almost invisible. Rain was forecast for this afternoon but unfortunately it never materialised so I don't know if they are going to leak or not this has been one of the more satisfying tasks as it has enabled me to remove one of the tarpaulins that have cocooned the boat since I started the project visible signs of progress.

I spent the rest of the day sanding and varnishing the last four of the locker lids all I need to do know is work up the enthusiasm for taking the fore cabin windows out.

Friday 6 May 2016

Stern tube, further engine work and windows

Sigh of relief on Monday morning when I found that the propeller shaft was still turning freely I hadn't stuck it all together with epoxy. I pulled the stern tube forward after gently tapping round it with a hammer and removed the split plastic waste pipe all I had to do was give it all a wipe over with white spirit to remove the wax polish and then coat the two faces with Sikaflex and bolt it all together I was sparing with the sealant hoping that it would not squeeze out internally and glue the shaft up.


Stern tube bolted up

The shaft was still turning freely when I went home hopefully it will still be OK on Wednesday.

The next job was to fit the engine raw water sea cock this is normally a two handed job particularly with the Marelon ones unfortunately there was no one around to give me a hand so I managed to hold the skin fitting up with a piece of timber while I screwed the valve on from inside this particular sea cock is right on the bottom of the boat so it was fairly easy most of the others are on the turn of the bilge which makes them very difficult or almost impossible single handed


Engine sea cock in place

Apologies for the poor photograph the flash on the camera seems to have blotted out the grey bilge paint.

I decided to make a start on the aft cabin windows which had perished seals and were badly crazed these had already been removed from the boat so after stripping them down I paid a visit to Hadlow Marine Windows on Wednesday morning to get the new perspex and mastic for refurbishing the windows. The chap there was very helpful I left him with the old perspex and he cut out the new windows while I walked up the road and had a coffee and a sticky bun. The perspex in the old windows seemed to be a bit on the thin side at 3.5mm the new ones will be 5mm there is ample space in the frames for the increased thickness the channel being 9.5mm wide. Putting the windows back together will be this weekends homework job.


Windows stripped down


Crazed perspex


Perished mastic seal


window refurbishment kit

The fore cabin windows are in a similar condition so these will be next on the list when the windows have been replaced in the aft cabin the saloon windows are toughened glass which is in good order however the mastic seals are suspect and even if they don't leak now once the boat is in the water and sailing I expect that there will be a degree of flexing which will lead to leaks so they will be resealed.

Got to the boat just before lunch and removed the new engine mounting plates so that they could be drilled and tapped for the engine mount bolts. Checked the propeller shaft and it was still turning freely there was some Sikaflex stuck to the shaft but on sliding it back I found that I could clean it off from the outside I spent the rest of the day sorting the wiring harness and the connections onto the engine luckily the previous owner had taken photographs when removing the engine.

I drilled and tapped the engine mounting plates yesterday and put them back in place this morning and bolted the engine down I still have to fit the stern gland I am hoping that I can remove the coupling from the shaft I managed to remove the two grub screws and there doesn't appear to be any pins through the coupling I will try and pull it off on Monday if not it will mean rigging a beam across the cockpit and lifting the engine high enough to allow the shaft to slide inboard so as to fit the gland up from the outboard end.

I finished up today by sanding some of the locker lids for the aft cabin start another round of varnishing next week.