Friday 31 May 2019

Cable locker, no2 battery etc.

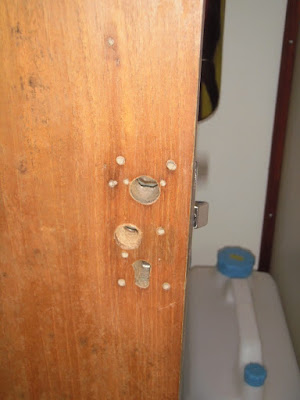
Last weekend I sorted through the bag of hardwood trim that came with the boat I found a couple of pieces which would cover the joint between the two sections of the locker panels for the forward cabin, they are of a similar width to those for the aft cabin, however the screw holes are a bit irregular so to be environmentally friendly I have drilled out and plugged the existing screw holes using the offcuts left after cutting the timber to length I am not sure if this is recycling or upcycling either way it saves money. Also since I had decided it was time to fit a second battery I made up  a short piece of 25mm2 cable to form the link between the two negative battery terminals.


Original screw holes

Also in the above photograph is the chain locker door before I added the edge trim.

First thing Monday I gave the deck a good scrub down to get rid of the accumulation of last winters dirt I then finished up the day by cutting to length  some more of the trim pieces for the forward cabin.

I didn't find the time to fit the edge trim to the chain locker door over the weekend so this was the first task on Wednesday morning, once this was complete I was able to trial fit the door. I finished up the day by applying the first coat of varnish to the edge trim.


Chain locker door

First thing this morning I put a second coat of varnish on the chain locker door edge trim and put it on one side to dry. The second battery had arrived on Wednesday so the next job was to get it on board and down into the battery locker and connecting it up, it is secured with a ratchet strap as per the no1 battery, a bit more recycling as these ratchet straps came with the boat and were used for securing the tarpaulins covering the boat just a matter of shortening the webbing. 


No2 battery in place and connected

Once the varnish was touch dry I carefully fitted the chain locker door, it just requires the latch to be fitted before the job is complete.


Friday 24 May 2019

Forward cabin continued

This week has been a bit of a short week work wise as I had a trip out into the Swale on a friends boat on Monday however I did manage to achieve the main aim of the week which was to line the hull sides in the forward cabin. T start with I removed the locker panels and then scraped off the loose flaking paint on both sides before washing down with hot soapy water. Once everything had dried I cut out the lining carpet and glued it up with spray contact adhesive, after doing the starboard side I had run out of 'Trimfix' so in order to expedite the job I picked up some 'No Nonsense' spray contact adhesive from Screwfix, time will tell if it is as good it certainly smelt much the same, we shall see.


Starboard side lining

Once the lining was complete I replaced the front panels and had a good clear out so that the forward cabin looks much less like a construction site.


Starboard side front panel back in place

I have put the old berth cushions back in place for the time being as replacing them is not a high priority at the moment, I usually sail single handed most of the time and there are plenty of other berths to choose from on this boat.


Forward cabin after cleaning up

As can be seen from the above photograph the new cushions will need to be a bit wider as originally the front panels came down to the internal moulding but as outlined some time ago this left an awkward shaped space at the bottom of the lockers so I had previously reduced the front panels. As well as finishing off the cable locker door over the coming weekend I will go through the bag of hardwood trim pieces that I have to pick out some bits to tidy up the front panels. The cable locker door has been painted and just awaits the edge trim which I also hope to fit this weekend so that the door can be fitted next week. New Morning is now beginning to show some semblance of order, there is still quite a lot still to do but it is mostly bits and pieces of detailing, the boat is now perfectly usable.


Friday 17 May 2019

Back to the forward cabin

I started on Monday morning by trimming off all the plugs in the aft door frame and then trimming up the door frame so that the door would fit within the frame then once I was happy with the fit I secured the door and made a final adjustment to the frame to ensure that it would open and close smoothly. I had to re position the door hold back hook as due to the manner in which I had reinstated the door opening the door was considerably higher than it was originally. I finished the day by stripping and cleaning the original door latch.

The first job on Wednesday morning was to refit the door latch and the new catch plate this entailed fitting a block to the door frame to take the catch plate in a similar manner to the forward door.


Aft door fitted

As with the forward door I have screwed a temporary stop to the door frame to prevent any straining of the frame until the architrave/door stops are fitted, the temporary stop is the small block fitted just above the catch plate mounting block.

I began today by cleaning the inside face of the aft door with acetone which removed most of the odd bits of sticky stuff and left the door looking a bit more presentable once that was done I trimmed the plugs in the screw holes in the catch plate block, this is as far as I can go with the doors until I have obtained the material for the architraves. I then moved on to the forward cabin which was accessible now that the doors are out of the way, I started by clearing out all the rubbish and having a good clean up, the priority is to fit a door to the cable locker to prevent the east coast mud from flying off the anchor chain and spreading itself around the forward cabin which it is prone to do as the chain drop is very close to the door opening. I had cut out the plywood door blank some time ago but that is as far as I had got, so after marking the position of the finger hole I put it aside as a homework job for the weekend when I will sand and paint it ready for the edge trim. 


Door blank for the cable locker

I finished up the day by lining the after end of the anchor well between the two side locker panels using some of the grey van lining carpet.


Lining on anchor well

It can be seen in the above photograph how close the anchor chain is to the locker opening. The aim next week is to line the hull sides in the lockers on both sides of the forward cabin with a view to making it a bit more presentable, it does however need some new cushions to replace the existing rather tatty ones which are possibly the originals also I think that they have suffered somewhat from the attention of rodents while in storage.

I have had the first sight of the new swan family on the creek this week.


Friday 10 May 2019

Still more doors

I made the top section for the aft door frame, in the same manner as that for the forward door, last weekend so the first job on Monday morning was to shape it to fit it into the door opening so that I could then mark the inner radius from the door.


Trial fitting of top frame section after marking the inner radius

I finished up the day by fitting the catch plate for the forward door I had forgotten to take the sketch home with me last Friday so I had made it from memory, unfortunately my memory is not what it was so there was some adjustments to be made. I took the top section of the frame home with me so that I could cut out the inner radius with the jig saw, I find it easier to do this sort of thing in the workshop.

On Wednesday I made the right hand vertical part of the door frame and then glued and screwed it in place along with the top section and left it to cure, to finish up the day I had a good clean up as it was a wet and windy day I had to work inside so there was a lot of dust and wood shavings to clear up.

Today I made and fitted the left hand vertical section of the frame and once I was happy with the fit it was screwed and glued into place.


Door frame in place

There was not much else I could do until the epoxy had cured so I finished up by plugging the screw holes around the frame  and having another clean up. Over the weekend I aim to make a new catch plate for the aft door latch, the original had gone missing and in any case it was only a piece of stainless steel or chromed brass strip so I think I can produce something better then next week the aim is to get the door hung, it will be nice to get them out of the way. There will still be a bit to do to complete the work the biggest part being the architrave/cover strip which will be required on both sides of the doors also an infill piece will be required at the bottom of both door openings as can be seen on photographs of the forward door but this will be just a simple piece of plywood.


Friday 3 May 2019

Doors again

The first job on Monday was to glue and screw the left hand vertical section of the forward door frame in place then while waiting for the epoxy to cure I plugged all the screw holes, the plugs were cut from offcuts of timber left after cutting out the curved top section of the frame and glued in place with varnish.


Screw holes plugged.

I had made a stainless plate over the weekend and while the varnish on the plugs was drying I drilled through the door for the new latch and then fitted the plate followed by the door latch and the handles, unfortunately there are a number of redundant holes on the other side of the door in the blue laminate which were not covered by the new latch I am not sure what I am going to do with these at the moment but eventually I want to refinish both doors as the veneer on the opposite side of both doors needs some attention as well but this will be a job for the future as the main aim is to get the doors in place and out of the way.


Redundant screw holes etc


Stainless plate and new handles

On Wednesday I cut off the excess length of the plugs and sanded them flush and then faired in the various sections of the frame so that the door would open and close smoothly without sticking.


Frame faired  to allow door to close

I then moved on to the aft door beginning with temporarily screwing in place a piece of timber across the lower end of the door opening to support the door at its correct height to allow measurement of the door frame components, this led to the discovery that the sides of this door are not parallel they taper down by about 5mm at the bottom edge of the door, the sides of the opening are also not parallel, I can allow for this by tapering the frame side members.


Aft door set in position

I have sourced some more meranti for the aft door frame which I collected from a local timber merchant this morning, the supplier of the timber for the forward door frame did not have the required material in stock for the aft frame but could deliver from a central warehouse for £20 almost the price of the timber, the saloon bulkhead is much thicker than the forward heads bulkhead so requires thicker timber for the frame. After double checking that I had sufficient timber for the aft door frame I finished up the day by making and fitting a wooden block to take the catch plate for the forward door latch, this was screwed into place and the screw holes plugged. Over the weekend I shall make a new catch plate as the one that came with the latch would need some modifications before it could be used and as it is made of chrome plated brass I decided that I can do better with a piece of stainless steel.


Block for  catch plate mount

This weekend the aim is also to produce the curved section of the frame for the aft door then once the aft door has been fitted I still have to produce the covering board/architrave to cover the join between the door opening and the frame this will also form the door stops.