Sunday, 28 July 2019

Its been a bit warm this week

Apologies for the late post but a few other things got in the way, it has been a pretty warm week and not a lot has been done I put up an awning over the cockpit drank some tea and in between I did a few more gelcoat repairs I haven't included any photographs as it is pretty straightforward stuff, grind out and then add as many coats of gelcoat as required to fill the voids followed by the final coat with 2% wax in styrene added to exclude the air so as to allow the gelcoat to fully cure. Once it had fully cured it's just a case of sanding it back.

I did investigate the bilge access hatch in the heads with a view to recovering the plywood, it was covered in some vinyl imitation planking material which was well past its sell by date, breaking away at the edges and badly stained with various sticky stuff.


Bilge access hatch

I removed the vinyl using a chisel to peel it off, the next task was to remove the contact adhesive I find that the tungsten carbide pull scraper will remove the majority of the stuff with a little bit of effort I then finished off with some 80 grit green paper.


Hatch all cleaned up

Because there is a shower in the heads I plan to coat the hatch with epoxy before re finishing the upper surface, I have some Dek King fake teak left over from a project on my previous boat unfortunately there is not quite enough however I have just enough if I use a couple of pieces of Tek Dek which is almost identical except that one is very slightly wider than the other, the Tek Dek was left over from a project on an even earlier boat, Nina the Hurly 22.


Friday, 19 July 2019

Compass light

I ran the cable for the compass light quite some time ago, I had left it coiled up below the steering pedestal with the intention of connecting it up sometime in the future. On Monday morning I took the compass out to see what was required to connect the light only to find that the twisted pair cable had been cut/broken off leaving two very short tails. Further investigation showed that both wires were originally soldered directly to the lamp and one of them had come adrift, I tried to re solder it to no avail, I found a replacement from Force Four chandlery which was duly ordered on Monday evening

Wednesday was spent cleaning up the mounting for the compass there was an old rubber gasket together with large amounts of silicon sealant to be removed, also the screws which hold the bezel were short machine screws which were fitted into tapped holes in an aluminium ring which was then screwed to the top face of the steering pedestal. The threads in the tapped holes in the aluminium ring had corroded away so I countersunk the holes from the underside of the ring so that I would be able to retain the bezel with countersunk screws and nyloc nuts inserted from below.

The new lamp arrived on Wednesday so on Friday morning I fitted it into the lamp holder.


New lamp on right original to the left  of the picture


New lamp fitted to the lamp holder

The twisted pair cable was connected to the supply cable using a connector block I know I don't like them much but by securing the connector block to the inside of the steering pedestal, with a self tapping screw from the exterior, I was able to support the weight of the supply cable so that the strain was not taken by the twisted pair which is very thin. The compass was then re bedded into the steering pedestal using closed cell foam tape.


Self tapping screw to secure connector block


Compass in place note nyloc nuts on the bezel

It can be seen from the above photographs that the steering pedestal could do with re coating I am assuming that the black finish is probably original I am not sure what it is, possibly powder coating, this will be a job for next winter. I finished up the day with a bit more cosmetic stuff removing various paint and glue splashes from various bits of stainless steel handrails etc some were down to me but previous owners are also guilty the black spots in the photograph are rain.


Friday, 12 July 2019

Water pump

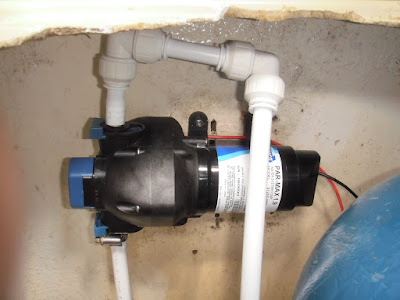
This is going to be a bit of a short post as I was away on a sailing trip last week and there have been a few interruptions during this week. On Monday I arrived at Conyer and switched on the power the domestic water pump made a grinding noise and stopped, I disconnected it and on lifting it out some rusty water ran out of the casing between the pump and the motor this was supposed to be the dry side of the pump there was nothing for it but to replace the old pump. It is possible that it was the original the serial number started with 1975 the year the boat was built, if this was the case then it had done pretty well either way spares were not available. The next port of call was the chandlers where I purchased a Jabsco Par Max pump with integral pressure switch.

The next project this week was to fit a new lifting wire to the up and over garage door followed by fitting some wheels on number two daughter's inflatable dinghy.

Once the other distractions had been sorted I set to and installed the new pump, as is usual the pump connections were different to the original which had screwed suction and discharge connections which would accept standard push fit tap connectors for the plastic plumbing system I had installed, the new pump came with hose barbs although alternative screwed connections were listed in the instruction manual I could not seem to source any. The plastic pipe that I used for the plumbing would not fit the 13mm hose barbs so as a last resort I warmed it up in boiling water and was able to force it on the hose barb,once it had cooled it was a tight fit I took the precaution of adding a Jubilee clip to the discharge side, the pump was then installed and the power supply connected.


New domestic water pump

When the pump was switched on it sprang into life it is noticeably less noisy than the original it also pumps the system back up to pressure much more quickly. For the rest of my limited time this week I pottered about cleaning up the sole in the heads it was a splattered with impact adhesive during the headlining work it still looks a bit rough so I am thinking of re gelcoating it possibly taking the opportunity to lay up some more glass to stiffen it up a bit as it is a bit flexible especially around the opening to the bilge in the centre.