Friday, 31 July 2020

Forward cabin

On Monday I added a further layer of glass to the forward cabin sole, to make life easier I made it in sections as the first layer but cut them in such a way that the joints between the sections were overlapped. I spent the rest of the week filling and fairing paying particular attention to the fillets between the sole and the upstand.


Fillets after sanding


Second application just requires sanding

I took a chance and ordered some green beige RAL1000 gelcoat from East Coast Fibreglass Supplies which arrived on Wednesday. The colour chart on the website looked to be a good match to the existing, yes I know on screen colour rendition can't always be relied on but I took a chance. I haven't opened the tin yet to check, that will be a job for Monday. 

Friday, 24 July 2020

Gelcoat

The first job this week was to finish sanding the fairing compound on the heads sole, once I was happy with the finish I applied two coats of gelcoat followed by a single coat of flocoat. As the final coat is the same colour as the previous coats the most critical part of the job is making sure that the gelcoat is completely covered otherwise there will be areas where the gelcoat has not cured completely, however when I ran my hand over the sole this morning there were no sticky patches. Hopefully I have applied sufficient to enable me to sand back to leave a smooth finish.


Sole after gelcoat applied

As expected the finish is a bit rough which does not show up in the photograph.

The next job was to lay up three layers of biaxial cloth on the forward cabin sole which had suffered some cracking as well as a section having been cut away to allow the replacement of a section of the bulkhead under the cabin door.


Cracks just visible in corners of bilge access opening


Forward cabin sole

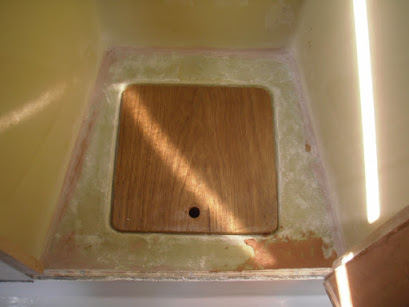
It can be seen that there is quite a gap between the moulding and the bulkhead the port side being much wider than the starboard and there is no evidence of the moulding being tabbed to the bulkhead. When I bought New Morning the sole had very little support especially as the upstand had been cut away which had led to the cracking in the corners of the bilge access opening. Some time ago in order to improve the situation I had screwed and glued a hardwood support to the bulkhead underneath the sole and then reinforced the corners of the opening with a couple of layers of CSM laid up from underneath the moulding, this had stopped any further flexing and damage. The plan now was to lay up three layers of 450g biaxial cloth over the sole and to form an upstand bonded to the bulkhead and then re gelcoat, however I found that 450g was far too heavy, the first layer was fine as it was made up of four sections but the subsequent layers in one piece could not be formed around the double bends of the bilge access opening, I had a similar problem with the heads sole, see last weeks post, but as the forward cabin sole is much smaller it was therefore much more difficult so in the end I called it a day with just the one layer, I shall have a rethink on Monday.


Forward cabin sole with one layer of biaxial cloth


Friday, 17 July 2020

Filling and fairing

This will be a short post this week I was hoping to get as far as getting the gelcoat on the heads sole but I ran out of time. I did however spend some time measuring up the surplus biaxial cloth that I had left over and with a bit of fiddling about there will be just enough to put three layers on the forward cabin sole if the first layer is made up of offcuts, but that is going to be the next job. Back to the job in hand I started by mixing polyester resin with micro balloons to produce some fairing compound, this was applied to any obvious low spots particularly on the repaired upstand and also to form a fillet all around the existing upstand. Once it had cured I started sanding it all level which was a bit time consuming also extremely messy the dust gets everywhere. It is now mostly complete just a little more sanding on the fillets which I have to do by hand, and there a few small areas which require a further application of fairing compound.


After sanding

I finished up the week by having a bit of a clean up once the job is complete I will have to have a good clean right through. The sole is now noticeably stiffer it still flexes a little bit at the left hand end of the opening but this is the area with the largest overhang and with the large opening I guess it would probably need at least three more layers of glass to make it totally rigid but I am satisfied with it as it is at least the sole does not creak and groan when you walk on it now. 

Friday, 10 July 2020

Still on fibreglass

The materials for the heads sole arrived last Friday, usual good service from East Coast Fibreglass Supplies, so this week I was able to crack on with stiffening up the sole. I started by giving the existing sole a good sanding with a random orbital sander and some 50 grit discs followed by a good clean up. once this was complete I cut out the three layers of 450g biaxial glass cloth so that everything was ready for me to start straight away on the job on Wednesday morning. I started on Wednesday morning by cleaning down with acetone before laying up the three layers of glass cloth on the sole and then left it to cure.


After glassing over the sole

The first task today was to trim round the bilge access opening with an oscillating multi tool, I have a Bosch cordless and is one of the most useful power tools that I have should have bought one years ago.


After trimming the opening

I had some problems getting the biaxial cloth to form itself into the access opening as there is a tight double bend which forms the recess for the access cover as well as the corners of the opening and on inspection it would appear that the top lamination had lifted leaving a void along the right hand end of the opening, unfortunately it does not show up in the photograph. I think maybe that 450g cloth was a bit on the heavy side and that I would have been better going for perhaps four layers of 300g cloth however the rest seemed to be OK. To rectify the situation I cut off the bubble, which was only one layer, with the multi tool, before building up the recess with a strip of biaxial cloth and some more resin. The whole area will require a good sanding and some fairing compound before gelcoating, as a job like this is basically working in reverse, the normal method of fibreglass construction is to start out with a polished mould into which goes the gelcoat followed by the fibreglass. Trying to lay fibreglass that is level enough to take the gelcoat is a lot more difficult especially as I am not an expert. Next week the aim is to get the sanding and fairing done and the gelcoat applied the plan is to use two coats of gelcoat with a coat of flocoat over it topreclude the air and allow it all to cure.


Friday, 3 July 2020

Back to fibreglass

After some thought I have decided to bring the heads sole repair level with the remainder of the upstand and then to stiffen up the sole, which is a little bit on the bendy side, with two or three layers of 450g biaxial cloth and resin then gelcoat over the whole lot on completion. I  started this week by laying up more CSM on the repair until I ran out of resin, once the resin had cured I sanded out the high spots leaving some low areas which are shallow enough that I can fill them with fairing compound made up with polyester resin and glass beads. The materials for the completion of the job arrived today so that I should be able to press on with this task next week.


After sanding the repair

The gelcoat on the sole is not in good condition there is some cracking which I think is more than likely down to impact damage it is also discoloured and even after sanding does not look very good so re gelcoating is going to be the best option. This has been a bit of a short post as a lot of time was taken cleaning up after sanding the new fibreglass although my orbital sander has a dust collection bag it still seems to spread dust everywhere, probably a better bet would be a connection to a vacuum cleaner.

Also this week I have been experimenting with wood dye in an attempt to match the merenti, that I am using for the door frames, with the remainder of the internal trim, that which I used for the cabinet door trim did not turn out to be a particularly good match so this time I have tried Colron deep mahogany which after several coats of varnish has turned out to be a much better match.


Test piece against the compression post trim

The odd patches are a result of the reflection of the camera flash in the varnish