When I first bought New Morning she came as a complete project with boxes of stuff, among them I found the guard wires and their stanchions. When I fitted them the forward most stanchion on the port side had been repaired at some time in the past, the top guard wire passed through the plastic plugs fitted to the top of the the stanchions however on the forward stanchion the plastic plug had been sheared off and had been replaced with a piece of stainless steel bent round to retain the guard wire and pop riveted to the stanchion.
Repair to stanchion
The above photograph is a bit of a reconstruction of the repair as I was well into the project and I realised that I had not taken any photographs.
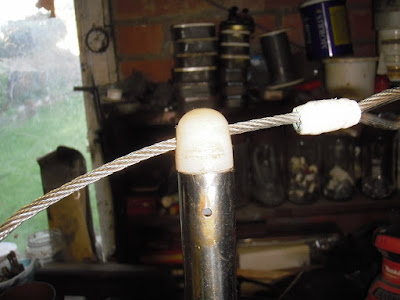
I had refitted the stanchions fully intending to getting around to making and fitting a proper plug in the near future however that was where the conundrum arose, the guard wires were terminated with eyes with thimbles formed with taulerite splices which were too big to go through the holes in the stanchions, the wires had been threaded through the stanchions and then the terminations added so the job was put on the back burner as I was quite satisfied that the top wire was quite secure. Recently I started looking at the job again when I realised that the pop rivets that held the stainless steel repair were almost non existent. I very much doubted that I would be able to obtain a replacement cap and in any case a new one would be a simple turning job I already had a piece of 32mm nylon bar to hand. The problem was going to be the eye on the end of the wire, I could cut the eye off, remove the original wire, fit a new plug and then thread a new wire through the stanchions and have new terminations put on but that would mean destroying a perfectly good guard wire together with the cost of a new wire and two terminations, time to think of a plan 'B'. After thinking for a while I came up with the idea of turning up a new plug drilling through for the wire and then cutting a slot from the bottom of the plug up into the hole so that I could spring it over the existing wire. In reality it was a little more complicated than that I started by roughing out the new plug about 1/8" over size on the two diameters before cutting the slot, I also left a larger diameter at the junction of the two diameters so that when set up in the four jaw chuck the slot was closed right up. The smaller diameter was then turned a close fit in the bore of the stanchion before the plug was reversed in the chuck and the top of the plug turned to the outside diameter of the stanchion and shaped to match the others. The plug was then sprung over the wire and secured with a 1/8" stainless steel pin through the stanchion and the plug, the plug was drilled through 3mm so that the pin would be a driven fit.
New plug fitted
The above photograph illustrates the problem with the size of the termination.
The slot was nicely closed up
I hope that I have made the method clear a couple of photographs would have made it all crystal clear but as I said the job was pretty well done before I realised that I had not taken any. The original plugs were white plastic while the nylon bar was 'natural' but the stanchions are far enough apart that the colour difference does not show.


