Friday, 25 February 2022

Further thoughts on the heater

 I have been looking into possibly installing the diesel heater in the steering gear space utilising CAD, that is cardboard aided design. I mocked up a bracket with the idea of glassing it to the inside of the transom. this will give a vertical surface to take the heater mounting bracket.


Mock up of heater bracket

This should allow the various connections to clear the steering gear without resorting to tight bends. Only other question is should I still go for a Russian made heater assuming of course that I can still get one.

I have also completed the woodwork in the heads by covering the gaps between the sole moulding upstand and the forward and aft bulkheads.


Gaps between sole and bulkheads

As can be seen the sole moulding is not a particularly good fit and from what I can make out was originally covered with an overlapping layer of the blue laminate, which the bulkheads were finished in, with varnished hardwood trim. Yacht brokers photographs of their boats for sale can be most useful even if you have no intention of buying the boat. As I did not have sufficient white laminate left I decided to use some more merenti dyed and varnished as the door frames. This was sizes to cover the gaps, if you get down on the sole the variable overlap does show up a bit but from a normal standing position I think it looks OK. It was finished with a fillet of white Puraflex 40 to seal the joint.


Timber trim varnished ready for fitting


All fitted

The heads are just about complete now I do need to finish fairing the gelcoat on the sole but as that will require applying more gelcoat it can wait until the warmer weather, The next task is to start getting ready for the upcoming season I hope that there will not be so many interruptions from the Wuhan flu this year.


Friday, 28 January 2022

Door frames finished this week

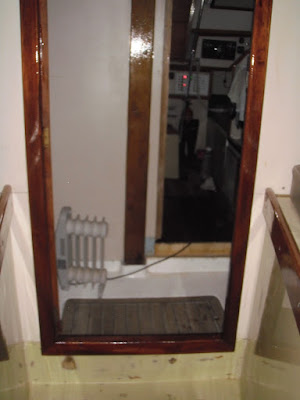
I finally wrapped up the door frames this week by completing the aft door. After completing the forward door frame I made up the final piece of the liner for the opening I had to glue two pieces together to get the right size it was then glued and screwed into place and then I cut two pieces of laminate for the infill on each side of the door. I already had the rest of the parts of the door frame made up so it was just a matter of securing them and plugging the screw holes, sanding all over and then applying two coats of Colron deep mahogany wood dye. Once the dye had fully dried it was just a matter of applying three coats of varnish and the job is done.


Aft door from forward


Aft door from aft


Aft door from aft

For the next project I will be looking at the diesel heater installation again I had originally planned on installing it in the void space at the aft end of the quarter berth, however this will entail fitting a square tee in the hot air duct almost immediately after the heater outlet which is not good duct work practise also the heater exhaust would need to be in the side of the boat again not recommended as when the boat is heeled water may enter the exhaust also I have heard of fenders being melted by being accidentally placed in way of the hot exhaust so it will be back to the drawing board next week.


Thursday, 30 December 2021

Door frames

New Morning has not been totally neglected since my last post I have been pottering about doing odd maintenance jobs but recently I became motivated to finish off the heads door frames. Since this involved making up four arch section pieces of architrave to suit the original doors I had been putting off starting the job, however I decided that it was time to get on and get them finished. I started by making the four arch sections these are made from six pieces dowelled and glued together before being cut to shape with a jig saw and sanding.


After glueing


Sections cut and dowelled

The straight sections were then cut and secured to the bulkhead with wood screws then once the arch sections had been fitted the screw holes were plugged and the whole lot sanded.


Forward side of forward door

Unfortunately I could not get far enough back in the forward cabin to get the whole door in frame, the architrave is wider on this side of the door so as to form the stops. Above the door can be seen the cover strips, I cut from the laminate used to cover the bulkhead, these are to cover the joins in the laminate infill piece after I had reinstated the original arch top doors. I was going to continue the architrave up to the head lining but I thought that this might look somewhat heavy by the time the wood had been dyed and varnished in any case I had lots of suitable laminate offcuts. I then gave the timber two coats of Colron deep mahogany wood dye followed by three coats of varnish to complete the forward door frame. It has turned out a bit darker than I was hoping for but there is a bit of a mixture of colours in the original timber trim anyway.


Aft side forward door


Forward side of forward door

I have now moved on to the aft door most of the parts have been made and temporarily fitted but I still have the liner in the bulkhead opening to fit at the base of the door and also some laminate to cut and fit to complete the bulkhead, I have just enough of the laminate that came with the boat to complete the job.


Aft face of the forward door

As can be seen from the above photograph there is still a gap under the door to be filled and the laminate to fit to the bulkhead.


Friday, 8 October 2021

About time I wrote something

 Over the past few months I have not done an awful lot on New Morning mostly cleaning and maintenance work the usual general stuff not really a lot to write about. However I have done a couple of bits and pieces which I will include in one post. 

I managed some sailing this year with a couple of trips across the Thames estuary, the first in July to the Colne and the Blackwater and in September to the Roach and then up the Crouch to Fambridge otherwise it has been a case of pottering in the Swale. The first job I carried out was as a result of the trip to the Colne, and after spending the night at anchor and then raising and stowing the said anchor I decided that the 35lb CQR anchor was going, I had already thought seriously about it on previous trips it was extremely awkward too  deploy and recover especially through the gap between the forestay and the pulpit so after this trip I decided that it had definitely got to go, After some research looking at selection charts I decided that a 22lb Delta would be adequate which was duly obtained from Cactus Marine who had a special offer on them.


New Delta anchor

The anchor was duly shackled on and duly tested on the trip to the Roach where I spent a couple of nights at anchor, including one night with a friends boat rafted up alongside, without any problems. I also found that it was much easier to handle as well as being 13lbs lighter the shank is much shorter. When I bought New Morning she came with two anchors, a 35lb and a 25lb CQR, the 25lb would probably have been OK for most of my anchoring but the pivot was too heavily worn to be of any further use which left me with the 35lb anchor 

The next job was a couple of pieces of woodwork, the first being a fiddle rail around the shelf over the steering gear compartment in the aft cabin. I used some 'L' section pieces of teak from the old cockpit gratings on my last boat I had to plug some old screw holes and butt three pieces together for the long side but I think that it all adds to the history as well as doing my bit for the environment


New fiddle rail

The butt joints can be seen especially as the grain doesn't match so I cut them at 45 degrees to make a feature of them. This has also covered an unsightly join between the laminate top and the moulding which had a rounded top edge.

The other piece was to make up a covering strip to hide the join between two pieces of laminate on the forward saloon bulkhead.


Join between laminate panels

I had run out of suitable pieces of the original trim that came with the boat but I came across an offcut of merenti which I had used for the heads door frames, it is not quite the right section but when coloured with Colron wood dye it matches the original trim quite well.


New covering strip


Reasonable match too adjacent vertical trim

The final job is to install an electric bilge pump in the engine space I have used a Whale Supersub Smart 650 auto. The pump is in position and has been wired to a control panel but is waiting for the installation of a skin fitting for the discharge.


Control panel installed adjacent to electrical switch panel


Pump in the engine space

This photograph is a reminder that I still have to do something with that horrible chocolate block connector for the engine wiring loom perhaps one of those multi pin plug and socket units.


Friday, 2 July 2021

Spinnaker Pole

It has been quite some time since I last posted so I thought that I had better do something about it, up to this week I haven't done a great deal what with the pandemic, yes I know we are all using that excuse, and the cold wet weather. Last week I finished scraping the bottom and got the antifouling on ready for relaunching on the following Monday which all went well the rest of this week has been spent putting things back together, filling water tanks etc. Next week I am aiming to service the engine and put the sails back on.

During the last lockdown there wasn't a lot I could do but I did have a look at the spinnaker pole which had been sitting at home since I bought New Morning. I knew that the sliding bolts in the pole ends were seized so I thought that I would use the time to try and sort them out. The ends were each retained with three self tapping screws which proved reasonably easy to remove given that they were stainless into aluminium. When I removed the ends I found that the bolts were fitted into a plastic sleeve and were seized solid in fact the only way to remove them was to completely butcher the sleeves I am not sure if it was a build up of crud or the plastic sleeves had soaked up water and swelled which some plastics particularly nylon are are prone to. I started looking around for a pair of new pole ends these needed to have a 40mm diameter spigot to fit into the hollow aluminium pole but this size seemed to be unavailable yes I could have bought a larger pair and turned them down to fit. Of course the next problem was the price they were for a boat after all, £48 each was about the best that I could find time for a plan 'B' especially as I usually sail single handed so don't get that much use out of the spinnaker although I have been known to pole out the genoa on my previous boat. I decided to make some new plastic sleeves and went to my favourite engineering plastics supplier  at www.directplastics.co.uk and purchased a length of 30mm diameter Acetal rod 500mm long. This material is ideal for this application as it is not known for swelling when wet it is also easy to machine the swarf coming away easily, with some plastics it can wind itself tightly round the bar as it turns it also provides a good bearing surface. I have used this company on several occasions they have a reasonable minimum order policy and the price was reasonable £10.48 inc VAT. Delrin would also have been suitable having similar properties but it is a little more expensive.


Spinnaker pole end striped

I turned up two new sleeves the bolts are 3/8" diameter so I drilled them out to 25/64" as drilling plastics can sometimes end up with a slightly under size hole.


Replacement sleeve

The sleeves are retained with a couple of self tapping screws through the flange the holes can just be seen in the above photograph.


Two pole ends complete ready to fit back into the pole

Once the ends were complete the reassembly of the pole was straightforward it is now back in its brackets on the boat one of those satisfying jobs completed with minimal expenditure.


Friday, 23 October 2020

Lift out

 I started this week by taking off the sails and the spray hood ready for lifting out on Wednesday, as I had an appointment with the coronary rehab team on Wednesday the plan was to move the boat round to the lift out berth on Tuesday afternoon. Once the berth was clear I fired up the engine and tried to get the stern to swing to starboard using the prop walk, however there was quite a stiff southerly blowing which was causing the stern to swing to port and the prop walk would not overcome this. I think that the problem is that New Morning only has a 12"x7" propeller as the engine has a 1:1 gearbox great for reducing the drag when sailing but just when prop walk might be useful its not there. In the end I had to go down the creek to a wider part and turn round, travel half a mile to cover 50 yards. I went over to Conyer today to find New Morning lifted out, pressure washed and sitting in a cradle so I got on with cleaning and stowing the fenders and stowing the mooring lines before conducting an inspection of the hull below the waterline, the first time I had seen it in over two years, it all looked pretty good apart from the brown east coast mud deposits which are like concrete. The keel looks good with no rust showing, it had a good dose of rust converter and two coats of underwater primer before anti fouling. 


East coast mud

Before New Morning was launched I had to remove a very poor repair to the base of the skeg, it did not take a lot of effort, in fact the whole lump just fell off this was detailed in a much earlier post, I then ground out the defective GRP before building op the base of the skeg with woven rovings and epoxy and on inspection it would appear that it was a successful repair.


As can bee seen from the photographs above some of the anti fouling has fallen off but the skeg repair is still sound. The cutlass bearing is good for further service but the shaft anode has disappeared so will need to be replaced. The hull anode is showing some wastage but is probably fit for further service. So really all that is required this winter will be a scrape down to remove the mud deposits and a new shaft anode.


Propeller shaft and hull anode


Friday, 16 October 2020

Went sailing today

I started this week by having another look at the wind instruments, I checked the continuity of the cables as far as the connection box in the heads, there seems to be no problem up to this point it looks as though the problem is either in the mast or at the masthead but I am not taking it down just for that. I finished sanding the forward cabin sole it is just needing the final coat of flocoat. With the lift out programmed for next Wednesday I decided to go for a final sail, with a Northerly 2 or 3 it was not too bad although some sunshine would have been been welcome.


The last photograph is the new waste to energy plant at Kemsley looks as though part of it has been built with 'Lego' bricks.