Friday, 29 December 2017

Bilge pumps

Another short working week this week and the weather has been pretty poor however I managed to rebuild the saloon bilge pump with new diaphragm and valves.


Saloon bilge pump

The keen eyed amongst you will of course have noticed that a couple more hose clips are required to complete the bilge pump installation.

When I installed the discharge hose for the engine space bilge pump I assumed that as the skin fitting was on the starboard side the hose would be a straight run from the starboard side hose connection on the bilge pump but on stripping the pump this turned out to be a wrong assumption. This pump is hung from the underside of the cockpit floor and to end up with the pump discharge on the starboard side it was only a matter of removing two bolts and inverting the pump however the two bolts were proving to be obstinate and with there not being a lot of room I decided to remove the whole pump.


Engine space bilge pump

The mounting bolt holes turned out to have nylon bushes with the bolts being a tight fit in fact I had to drive them out.


Nylon bushes moved to new position to allow inversion of the pump body


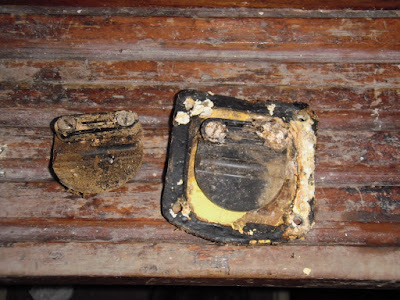
Old pump valves from engine space pump


Old pump diaphragms

The old valves were removed and the parts cleaned up ready for reassembly with new valves the suction and discharge valves bot utilise the same rubber flap except that the discharge valve is fitted to a frame and inverted. The service kit includes new screws for securing the valves the four short screws are for securing the flap valves and the four longer screws are for securing the discharge valve frame.


New suction valve fitted discharge valve on the left


The above photograph shows the pump after being inverted to bring the discharge hose connection to the starboard side and both new valves fitted it just needs the new diaphragm fitting and then replacing in position which will be the first job on Monday.

In between working on the two pumps I resealed a couple of the leaking toe rail bolts using penny washers and some closed cell neoprene tape just need another rainy day know to test the repairs.




Thursday, 21 December 2017

Bilge pumps and lighting

It was always going to be a busy week but I did manage to get a couple of days work in, I was hoping to be able to get back to outside work but although the weather has warmed up it has been far too damp to even think about painting. I did spend some time scraping the flaking paint from the starboard side of the aft cabin I don't know what type of paint it is but the flakes are white at the front and black at the back, possibly some sort of anti condensation coating, but it all needs to be removed before attaching the lining carpet.

New Morning has two Whale Gusher 10 mark 2 bilge pumps one in the engine space the other in a saloon locker both require attention the diaphragms have gone hard and the valves will probably need replacing, fortunately the service kits for the current mark 3 pumps have the required parts to fit the earlier model it appears that it is only the valves that are different, so while in the local chandlers recently I picked up a service kit with the intention of stripping both pumps and overhauling them. I only bought one service kit on the assumption that at least one of the pumps could be made serviceable. On stripping the saloon pump I found the clamping arrangement for the diaphragm to be in very poor condition but the rest of the pump should be fit for further service.


Clamping bolt for the diaphragm


Clamping nut


Replacement parts

The clamping arrangement is made of aluminium with what appears to be a plastic coating and as can be seen from the photograph the coating had gone and the aluminium nut was heavily corroded. The pump in the engine space was in a much better condition such that I have decided to refurbish both pumps and on consulting the ASAP Supplies website I found that spares are available for the clamping arrangement albeit at a price, it also comes with the two circular plates that fit either side of the diaphragm I don't really need these but it will still be cheaper than replacing the entire pump so I sent an order to ASAP Supplies on Tuesday evening and the goods arrived today, the usual excellent service from this company.

Last weekend the weather turned out to be much too cold for varnishing but I did find some 12 volt led spotlights to fit over the berths in the saloon, forward and aft cabins, six were duly ordered and these arrived on Tuesday so Wednesday was spent installing and wiring them. They have a touch sensor switch which gives two levels of light the first a blue halo night light around the switch and the second brings on the main leds. Unfortunately the rest of the night lighting in the saloon and heads is red but at the moment the saloon spotlights are wired such that they will not operate when the red night vision lighting is in use but this can be easily changed by swapping a couple of spade connections.


Night light


Main light

The one downside of these fittings is that I don't think that the leds are replaceable but given their supposed long service life hopefully at my age they should outlast me.


Friday, 15 December 2017

Aft cabin

I have had a distraction or two this week but I have managed to move the aft cabin refit along a bit further I finished with the internal moulding on the port side by removing all the old paint from the bottom of the port side lockers. Once this was complete I had a sort through the pile of timber which had been dumped down here most of it in case it comes in useful some of it was not worth keeping so has been dumped the rest moved over to the port side so that I could make a start on the starboard side the internal moulding was cleaned up and any paint removed before giving it a going over with some wet and dry paper which has cleaned it all up quite nicely. Next I went for a trial fit of the aft locker front panel as with the port side it proved to be a tight fit.


Starboard side panel trial fit


Moulding after clean up


Aft cabin

There are a couple of persistent little rainwater leaks from the bolts securing the toe rail which will have to be addressed before anything else is done and the two forward panels require the timber trim around the door openings to be varnished which will be this weekends homework project.

I have been having a rethink on the forward cabin lockers as previously posted the front panels are a really poor fit and I was going to make new ones however after looking at various brokers photographs of Moody 33 yachts for sale it would appear that on the later mark 1 and the mark 2 boats the locker front panels do not come all the way down to the internal moulding they stop short by approximately 10 to 12 inches. Now as there was originally an internal shelf which left an odd shaped void space between the underside of the shelf and the internal moulding which was of no use to man nor beast and leaving out the shelf wouldn't improve the situation. I have therefore decided to follow the later design which means I can trim up the original panels to suit, this will save at least one new sheet of plywood. To this end I trimmed the top edges of the panels so that they were all level and then cut the required amount from the bottom edge this had the added advantage of removing some minor damage to the lower corners. There are no pictures I am afraid but there are pictures of the panels showing the poor fit on an earlier post. I intend to paint these panels white as for the aft cabin and then add some varnished timber trim, painting will be the next homework project after the aft cabin panels are complete.

That about wraps up this weeks efforts next week will be a short working week I expect due to Christmas so it remains for me to say bah humbug to all my readers.


Friday, 8 December 2017

Inclement weather this week

The week started cold and bright however on Monday morning the boat was running with water from the previous nights heavy dew I did eventually manage to give all the new undercoat a light sanding and wash down and then retired inside to continue with wrapping the wiring and when I ran out of materials I set to and installed the cables through to the aft cabin for the stern navigation light and the aft cabin lighting. On Wednesday the temperature was high enough to put a coat of 'Toplac' on the transom and a second coat of 'Prekote' on the areas where the fibreglass repairs had been carried out.


Transom after first coat of 'Toplac'

The next task was to permanently attach the solar panel to the hatch garage I gave the area and the back of the panel a light sanding to provide a key for the adhesive then cleaned both with acetone before applying a generous bead of PU40 and pressing the panel down, I used a couple of weights to make sure the panel followed the camber of the hatch garage, and then left it to cure. To finish off the day on Wednesday I made a start on sorting the aft cabin the current homework project to refurbish the aft cabin woodwork has been slowly progressing over the last few weekends and has reached the point that I can start refitting the aft cabin. Up to now it has been used as a bit of a glory hole where stuff has been dumped for possible future use also as a paint/epoxy store so all in all it was in a bit of a mess. To start with I moved all the timber paint etc to the starboard side so that I could make a start on the port side. Over the next week or so the intention is to sort through the pile and anything not deemed to be of immediate use will be removed to my garage. Once the port side was clear the first job was to remove all the paint/varnish splashes from the berth moulding using a scraper and some fine wet and dry paper it has come up quite well it just requires polishing the locker lids will require a light sanding to remove the paint splashes and then a coat of varnish, they were all re varnished earlier on in the project.


Berth moulding after clean up

Today dawned bright and dry but it was far too cold to even consider painting even though the International Paints data sheet indicates that 'Toplac' can be applied at temperatures down to 5 degrees C it was not forecast to get above that all day and tonight's temperature is forecast as below freezing so it was back to the aft cabin. Once the clean up was complete I moved on to trial fit the port aft panel this one proved to be a much better fit than those of the fore cabin, I haven't done anything more with those yet, in fact the port aft one proved to be quite a tight fit I hope the rest prove to be likewise. I still need to paint and refit the locker doors and it looks as though I shall have to make some new shelves as the originals seem to be missing its not a major job but with the curve of the hull to fit it's always nice to have the originals for a pattern whatever condition they may be in. The intention is to line the hull sides with some of the van lining carpet it is great stuff for this type of thing as it has a high degree of flexibility in all directions and it has the added advantage of helping prevent condensation on the hull sides.


Port aft panel in place

Once the panel was in place I could mark up for the timbers to attach the panel to the aft bulkhead and underneath the deckhead these were then cut and secured in place with self tapping screws. Next weeks weather doesn't look particularly promising as far as painting is concerned so the plan is to continue in the aft cabin.


Friday, 1 December 2017

Wiring

This is going to be another of those short posts the very cold damp weather this week has meant that outside work has been brought to a stop for the time being. This week has been spent working inside on the electrical system the majority of the wiring had already been installed with most of the electrical/electronics operational however the wiring for the lighting on the starboard side of the heads, the aft cabin and the saloon reading lamps was still outstanding. The heads lighting wiring has now been completed together with the wiring for the port and starboard navigation lights and the saloon reading lamps. I have made a start on the tidying up and securing of the wiring using spiral wrap sleeving to protect and tidy the cables where they pass through lockers it is a bit of a slow process wrapping it round cables particularly on longer runs but it does tidy things up quite nicely.


Cables in the forward cabin in the process of wrapping

Note the spade terminal block in the top right of the photograph this where the supply to the port and starboard navigation lights is split I have used a number of these blocks in the installation of the wiring where more than one device is supplied from a single circuit in my view a better solution than using chocolate block connectors.


Heads locker cables


The above photograph shows the spade terminal blocks installed in the void space above the quarter berth these are for lighting distribution. As this area will eventually be enclosed the cables will be tie wrapped to tidy things up.

That about wraps up this week next week if the weather is agreeable the plan is to go back to exterior work but the plan 'B' is to wire out the aft cabin once the wiring is out of the way I can begin the reinstatement of the lockers in the forward and aft cabins installation of the wiring is so much easier when you are not trying to work through small openings.  


Friday, 24 November 2017

More topsides

Again most of this week has been spent on filling and fairing the topsides which has now largely been completed there are a few scratches etc to be dealt with but the more serious repairs are complete. After some final sanding with 180 grit paper I have started to apply the International 'Prekote' to the repaired areas the intention is to apply two coats before finishing with International 'Toplac', The transom was given its second coat today the whole area will be repainted as after the repairs there was not a great deal of the original paint left intact.


Transom after 2 coats of 'Prekote'

The area at the bottom of the transom was originally epoxy coated some of which was removed when sanding the repairs to the stress cracks in this area this will be reinstated before the anti fouling is applied.

As a little light relief from sanding the topside repairs I have progressed a little further with the electrical installation by pulling through and connecting the cables for the berth lights in the forward cabin also I have obtained a 30w solar panel and charge controller from Photonic Universe the controller has been connected and I spent some time today temporarily connecting the solar panel and deciding on a route for the cables from the panel to the controller which will require a cable gland and some additional cable. The intention is to mount the panel on the hatch garage.


Charge controller

The wiring to the charge controller still requires tidying up, the photograph is a bit blurred as the camera battery was about to give up and the screen had gone blank so it was point the camera and hope for the best. The controller is an MPPT (maximum power point tracking) which makes the best use of the power from the panel which gives an increase in the charging current than that which would be expected from a conventional PWM (pulse width modulation) controller don't ask it's all magic to me.

Another short post this week which belies the effort applied especially with the filling and fairing but the project is still moving forward. 


Friday, 17 November 2017

Topsides

Again this week has been spent on the topsides first off is the photograph of the completed repair on the port side which I had forgotten in last weeks blog.


Port side repair complete

First off this week I sanded the blue section of the topsides and gave it two coats of International Toplac which can be seen in the photograph above. I am not happy with the result probably more about my painting skills than the paint. I put on the first coat which looked reasonable apart from some runs which I sanded out and continued with a second coat in order to reduce the risk of runs I used a much thinner coat which made matters worse sure enough there were no runs but the brush marks are still visible. I shall leave it for the time being and get on with the rest of the topsides and if time and weather allows deal with it at a later date, however I take some small comfort in that it looks alright from the other side of the creek. Next time I will try using use a roller.

I then moved on and gave the transom a good sanding to prepare for painting it has come up reasonably well but requires a little bit of filling in places which I shall use some epoxy with West Systems lightweight filler.


After sanding

I then moved on to start sanding the gelcoat repairs on the starboard side I got as far as the aft area today again this area will also require the application of some filler in a couple of places, one of the problems using thickened epoxy is that it drags when trying to level it off I tend to try and build up the repair but then the stuff is hard work to sand back. The photograph below shows the moulded cove line which has been finished with what appears to be some sort of gold coloured tape which is peeling off in places but in others it sticks like the proverbial and it takes a lot of hard work to sand it away I don't know if a heat gun would be useful here the intention is to remove all the gold coloured tape and then paint it to match the rest of the blue areas of the topsides.


Gelcoat repair after sanding

The blog for this week seems to a short one in spite of the effort that has gone in but sanding epoxy thickened with colloidal silica does require some effort there will be more of this next week. 


Friday, 10 November 2017

Still more fibreglass

This week has again been taken up with filling and fairing the topsides starting with the repair to the top of the flair as described in last weeks ramblings the epoxy had completely cured over the weekend so the first job was to sand it down to the required profile unfortunately I seem to have forgotten the photograph the port side is now complete just a matter of painting over the repairs. most of this week has been devoted to the starboard side where there are two areas of more extensive cracking to the gelcoat it looks as though this is as a result of an impact or two. I had already inspected the inside and ascertained that the damage did not go right through the laminate and so the first priority was to open out the cracks to their full depth with the tungsten carbide scraper as with the port side.


The above photograph shows the cracks after having been opened up also visible are what I take to be the two impact points after I had removed the damaged gelcoat. The two impact points were sanded back so that the edges were tapered back then cleaned with acetone before adding several layers of CSM and resin following this the cracks were first cleaned with acetone before brushing in some straight epoxy then filling with epoxy thickened with colloidal silica see the photograph below.


The above photograph shows the impact damage on the starboard side aft some of the cracks and the impact point were filled last week and they were sanded fair on Monday morning the remainder of the cracks were filled today.

Also on the starboard side towards the bow there was evidence of a previous repair being carried out at the top of the flair I am assuming that it was similar to the problems of poor design and or layup that I had dealt with on the port side. Whilst the repair appeared to be sound the finished profile left a bit to be desired and so I gave the area a good sanding to remove the paint and get the profile as close as possible before proceeding to build up the area with epoxy and woven glass tape where necessary in a similar manner to the port side repairs. 


As with the port side I shall complete the job with some epoxy thickened with colloidal silica before sanding back to match the existing profile. I had hoped to complete the starboard side repairs this week but unfortunately the rain on Wednesday afternoon put a stop to the work all was not quite lost however as I have obtained some more tinned cable so that further progress was made with the internal wiring, this part of the project is almost complete I still require some light fittings for the over bunk reading lights but the aim for the time being is to run all the cables so that the installation can be tidied and the cables made secure.


Friday, 3 November 2017

Fibreglass continued

This week has been completely taken up with further work to fill and fair the topsides a further problem at the top of the flair towards the port bow became evident while opening up gelcoat stress cracks for filling again its a bit of Friday afternoon lay up where the CSM has not been pushed into the angle. After a gentle prod with a screwdriver a section of gelcoat virtually fell off and it was clear from the amount of dirt in the void that water had been leaking in for some considerable time. The photograph was taken after cleaning out the void.


Note the gap between CSM and gelcoat to the left

I poked a piece of stiff wire along the gap to the left and it went in a further couple of inches so I then removed some more of the gelcoat until I found more solid lay up.


After further gelcoat removal

There was still a very small void and I did consider removing the gelcoat for the whole length of this section up to the repair on the port bow and then building up with glass and epoxy however I am hoping that these are just isolated  areas so I decided to just build up this area. I cut some narrow strips of woven glass tape, cleaned the area and built up quite a few layers of glass and epoxy and then left it to cure. Later I sanded back the repair as shown in the photograph


First stage after sanding 

The second photograph was taken after building up further and then sanding back the surplus.


Second stage after sanding

After the second application of glass tape and epoxy I decided to finally profile the repair with epoxy thickened with colloidal silica in a similar manner to the port bow repair. In order to hold the epoxy in the correct profile I epoxied on a piece of woven tape with the woven edge along the top almost like shuttering this was also the case with the port bow repair but as the work was more extensive it came about almost as a matter of course also in this area the tape remained completely as part of the repair lay up.


Glass tape 'shuttering'

Once the epoxy holding the tape started to stiffen I filled the area behind the tape with more thickened epoxy using ketchup consistency rather than the usual peanut butter which made it a little easier to level off without distorting the tape. Once the epoxy has cured I would expect that most of the tape will be removed by sanding to finally blend the profile with the existing. While this has been going on I have filled and faired the remainder of the defects on the port side and also made a start on the starboard side. Some of the stress cracks towards the top of the transom cut through the name lettering which as a consequence will require replacement and as I am not a member of CYC, which I think is Colne yacht club, also New Morning will not be moored in Colchester it was an ideal time to remove all the lettering and give the transom a complete repaint which is where I finished work for this week. 


Bare transom

I will keep the New Morning name and once the mooring has been finalised I will add the home port to the transom together with the SSR number, which has seen better days, at present it is on the after end of the aft cabin coach roof and is not clearly visible because of the stern boarding ladder and the various appendages which are usually to be found hanging from the pushpit. Fortunately there is a local manufacturer of vinyl signs to be found around the corner from the boatyard.


Friday, 27 October 2017

More fibreglass

This week has been mainly spent on further repairs to the topsides there are a number of areas which require attention generally in the form of stress cracking in the gelcoat, damage to the paint and a couple of areas where the boat has, I presume, over ridden the fenders which has caused the gelcoat to be worn away. First off I dealt with some stress cracking on the transom which I believe may have been caused by contact with a solid object and a couple of smaller areas on the port topsides amidships. I started by opening out the cracks to their full depth and full length, I was going to use a Dremel to grind them out however I found that the corner of a tungsten carbide scraper was extremely effective.


Tungsten carbide scraper


Stress cracks in transom after opening out

After opening out the cracks I then cleaned them out with acetone before filling with epoxy thickened with West's 406 colloidal silica as these areas will be painted it is not going to show. I still have some more cracks to open out and fill on the starboard topside, hopefully the fine weather will continue next week so that I can complete this task.

The next task was to deal with the worn gelcoat on the port side there were two areas one had only just worn through to the CSM behind the gelcoat and the other was just an abrasion to the gelcoat.


Gelcoat damage

The worst damage is to the left of the photograph the other area does not show up at all well but the area which had worn through to the CSM can just be made out in the photograph below . The two areas were sanded down, cleaned up with acetone and then built up with two coats of gelcoat and a final finishing coat of flocoat.


After sanding


After gelcoating

The gelcoat was built up a little on the high side as the hull curves in two directions at this point both fore and aft and a marked tumblehome it is all too easy to end up with a flat spot in the centre of the repair. Once the gelcoat had cured I then sanded it to match the curves in the hull starting with some coarse, 40 grit, paper to quickly remove the excess and finishing with 180 grit paper, I find that pressing a steel rule flat across the repair helps to show up any high or low spots there is no photograph of this I am afraid as I only posses two hands.


After final sanding

The finished repair does not show up too well in a photograph taken in bright sunlight which I suppose is what we are trying to achieve hopefully it will be even less obvious once I have painted over it.

Finally for this week I masked up and painted the stripe around the hull above the boot top with International Toplac Mauritian blue the longest part of the job was applying the four strips of masking tape the full length of the waterline and then removing it all again after applying two coats of paint.


Friday, 20 October 2017

Fibreglass repairs

On Monday I set too and got three coats of gelcoat on the repair area and then finished up with a final coat of gelcoat with 2% wax in styrene added, also known as flow coat, as gelcoat will not fully cure in the presence of air the wax floats to the surface and excludes the air. To finish off the day I did a bit more to the navigation light wiring that is as far as I can go until I obtain the lights and some more cable.


After applying gelcoat

As applied the gelcoat is a bit rough but I suppose gelcoating a repair is a bit of a back to front job it usually gets sprayed onto a nice smooth mould then the GRP is laid up directly on to it. I spent most of Tuesday sanding the gelcoat back there were a couple of low areas which required a further application which I put on before finishing for the day.

Today I started with another sanding session which leaves the repair looking like this. 


After final sanding

There is a difference in the colour between the original gelcoat, the new gelcoat and the paint which has been applied to the topsides I intend to paint over the repair and try and match it to the existing paint finish if at all possible.

I finished off today by sanding the blue area along the topsides ready for painting next week. This is a short post but filling and fairing the repair has been quite time consuming


Friday, 13 October 2017

Don't you just love boat jumbles

After a bit more research I was convinced that the problem with the oil pressure gauge was down to the replacement head not being compatible with the sender which I was assuming as being original, the replacement gauge was calibrated 0-145psi while the original Perkins VDO gauge was 0-80psi with the engine running the needle was in the right position on the dial for approximately 57psi which is within limits and I suppose I could have repainted the face of the gauge however on my shopping list for the Kent boat jumble last weekend was an original Perkins VDO gauge. After walking almost right round the site I had bought some rope to make up a couple of mooring warps and had just about given up on the oil pressure gauge and then on the very last stall in the far corner of the site I found this.


Original Perkins VDO gauges

So for a few beer tokens I had a set of original gauges the key switch on the panel is beyond repair but the rest appears to be in working order first thing Monday morning I fitted the oil pressure gauge and started the engine and voila I have an accurate oil pressure gauge, a spare tachometer and a spare water temperature gauge.


Replacement oil pressure gauge fitted

Once the oil pressure gauge was sorted I spent some more time on the repair to the port bow I have now got the repair up to a level where it just requires filling and fairing I plan to do this with some gelcoat probably next week once the epoxy has had time to fully cure. It will probably require four or five coats of gelcoat to bring the repair up to the level of the original the weather looks promising for next week. I also spent some time cleaning up the topsides as there are several areas of gelcoat that require some attention mostly minor scrapes and a couple of areas with some stress cracking and also some old repairs that could be better finished hopefully the current mild weather will hold so that I can complete this work.


Port bow repair

I still have some outstanding wiring work to complete this is mainly the internal wiring for the navigation lights and the reading lights in the three cabins and so to finish off this week I ran the internal cables for the port and starboard lamps on the pulpit I have know almost run out of cable over 100 metres having gone into the job so far.

Over the weekend I shall continue with refurbishing the woodwork for the aft cabin I have one of the panels painted it just needs some varnish on the trim round the locker door openings.


Friday, 6 October 2017

Continuing port bow repair

Apologies for the lack of a post last week but I was away sailing for a few days and didn't get home until Friday afternoon followed by a bit of a short week this week however I have been continuing with building up the port bow area the section at the top of the flair has taken most of the time I have been building it up with epoxy and glass tape. It has been necessary to sand this area back  every so often to try and achieve the correct profile.


From the above photograph it can be seen that I am almost at the point that I can begin to fill and fair the repair area but first I need to make a couple of templates up from the starboard side so that I can copy the flair onto the port side, that will be a job for Monday.

While I have been waiting for the epoxy to cure on the bow I finished off the cable links between the sacrificial anode and various underwater fittings namely the 'P' bracket, rudder gland, rudder stock, the engine exhaust skin fitting and the engine. This was carried out in 10awg tinned copper cable.


Links to the anode


Connections to rudder stock etc

The current homework project is the woodwork for the aft cabin, after looking closely at the original woodwork it appears that the ply itself is in reasonable condition it is only the veneer that is peeling off so I have decided to remove all the old veneer clean up the woodwork and then paint it white and then varnish the trim around the locker doors. The original veneer, which I think is real wood with a foil backing, was glued on with an impact adhesive and while the veneer proved to be fairly easy to remove with a wide flat wallpaper scraper the old adhesive proved to be a bit more stubborn eventually I found that the way to remove it was with a tungsten carbide scraper followed up by a good sanding. The internal divider and shelves in the aft cabin lockers have been covered in a red flock type finish which was fairly common in boats of this age it looks as if it was spray applied through the locker doors once the units had been assembled in place so the rear of the front panels will require some work to remove the over spray before painting.


Panels showing peeling veneer


Original veneer showing foil back


First panel with veneer removed

I am not quite sure what to do with the sliding locker doors these are thin ply with the veneer glued to each side and once the veneer has been removed they may be a bit too thin I can think about them while scraping off the old adhesive. I had to remove the door knobs to get the doors out, the knobs are aluminium secured from the back with mild steel screws and after 40 something years of corrosion I had to drill the screw heads off to be able to remove the knobs.

It is the Kent boat jumble this Sunday and one of the more satisfying upsides of a project like New Morning is that I have a legitimate reason to go and with a good chance that I will buy something that I actually will use.