Friday, 21 September 2018

Engine back up and runing

The first job on Monday was to replace the engine heat exchanger and then connect up the various hoses and then after checking round all the hose connections I filled the cooling system and checked round for any signs of leaks. The next job was to turn the engine over on the starter to complete the priming of the fuel system which was as far as I could go until there was enough water to run the engine. To finish off the day I did a bit more scraping the old Treadmaster adhesive from the cockpit benches.


Port side after scraping contact adhesive

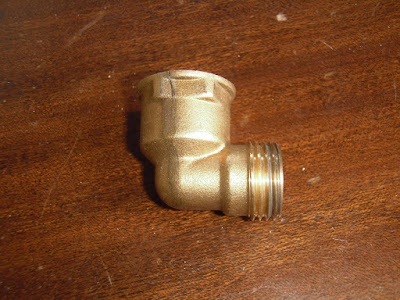
On Wednesday morning I noticed that the domestic water pump was cutting in intermittently which it had never done before, other than when the taps were turned on, on further investigation I found a substantial amount of water in the saloon bilge which when put together with the pump cutting in indicated a leak in the domestic water system. After checking all the joints on the system I found the leak on the elbow for the calorifier relief valve and after removing the relief valve careful examination of the elbow showed a crack in the fitting.


Elbow showing crack

Searching through the odds and ends box I found replacement fitting which was duly fitted and hey presto the domestic water system is back to normal. Again to finish off the day I spent some more time scraping the cockpit benches.

First thing this morning, as the boat was afloat, I started the engine and gave it a good run to check the fuel system which appears to be all OK the idle speed required a minor adjustment to bring it up to the correct setting of 625 rpm. I did a bit more to the cockpit benches until rain stopped play so to finish up the day I came inside and did a further investigation into the wind instruments but to no avail it is a tad difficult without ant form of manual this will be a rainy day job as they are not particularly high on the outstanding job list. Now that the engine is sorted the plan is, weather permitting, to go sailing next week. 

Friday, 14 September 2018

Fuel pump

This will be a bit of a short post this week and although it does not appear that much has been done but both removing the pump and refitting it have been fiddly time consuming jobs with regard to the amount of parts that had to be removed to gain access to the various fasteners on the pump. I started this week by remaking a couple of banjo connections on the secondary fuel filter, these had been weeping ever since I got the engine running but to reach them it was necessary to move the heat exchanger and as I had to do this to remove the exhaust manifold so that I could remove the fuel injection pump it was an ideal opportunity. Once the leaking joints had been repaired I gave the engine space bilge a good scrub down with the industrial strength detergent followed by a wash down with hot water the residue was then removed with the vacuum oil extractor.

I had a call on Tuesday afternoon to say that the fuel pump was ready for collection and so first thing on Wednesday morning saw me on the way to Rochester to collect it.


Refurbished fuel pump

I managed to get the pump in place and bolted up on Wednesday afternoon there is a master spline on the pump drive shaft which fits a corresponding spline in the drive gear it took a bit of fiddling about to get them to line up as once the pump is in position the spline in the drive gear cannot be seen however with a bit of trial and error it all of a sudden slipped into place.

I had a bit of a late start today but first thing I primed the low pressure side of the pump using the hand lever on the lift pump. I then went on to get the exhaust manifold back on together with the cooling water header tank and the oil filter, then connected the throttle and engine stop cables just leaving the replacement of the heat exchanger for next week. I expect that the idle speed will need adjustment as a new adjuster was fitted as part of the refurbishment that will be a job for next week when the tide is at a suitable time to run the engine, one of the disadvantages of a mud berth.


Friday, 7 September 2018

EU bio diesel grrrrrrrrrrrrrr!

I collected the starter motor on Saturday morning and fitted first thing on Monday morning there was just enough water to run the engine it started first time and the rebuilt motor turns the engine over noticeably quicker than it used to I think it must have been on it's way out for some time.


Refurbished starter motor

However the fuel injection pump is a totally different story it is still leaking and seems to be getting worse and on further inspection it appears not to be from the banjo pipe but from the pump casing mainly from the end cover and the joint halfway along the casing also from the stop shaft and the throttle shaft. These are all on the low pressure side of the pump and sealed with 'O' rings it is known that the diesel fuel available today which contains 10% bio diesel has an adverse effect on rubber seals etc fitted to injection pumps on older engines which I am assuming is the problem. When I first ran the engine there was no problem with leaks I am assuming that it had been running on proper diesel but as the bio diesel has got into the system it has started attacking the seals which probably were getting a bit hard. On Wednesday I set too to remove the fuel injection pump which turned out to be a bit of a pain, in order to get to the back mounting bolt I had to remove the exhaust manifold and to remove the exhaust manifold I had to remove the heat exchanger and to reach the final nut I had to remove the oil filter most of which was done hanging head first into the engine space.


Fuel injection pump finally out

I had intended to strip the pump and replace the seals myself but in view of the struggle I had to get the thing out but after thinking seriously about it I decided to take it to City Diesel in Rochester and have it completely stripped and overhauled I really don't want to be doing this job again anytime soon also it can then be properly tested. City Diesel is a one man business that I have used on a couple of occasions and has always done a good job at a fair price and on previous occasions has done the job while I waited although not possible this time.

In between struggling with the fuel pump I have faired in the epoxy repairs to the cockpit benches I always try to over fill the defects with thickened epoxy as it does shrink a bit on curing but this does leave a b it of sanding to do and if using colloidal silica it can be a tad tedious so in order to speed up the job I tried the oscillating multi tool to remove the worst of the excess and then followed up with sanding to finish, this proved to be highly successful a little care is required to prevent removal of the original surface.


Gas locker lid after cleaning up


Cockpit locker lid after fairing repairs

With any luck the fuel pump should be back next week but in the meantime I have the engine space bilge to clean up and weather permitting the cockpit benches to finish fairing and painting.