Friday, 30 November 2018

Inclement weather again

The weather at the beginning of this week was horrible, wet and windy, but as the plan was to get on with the internal fit out it was not going to cause a problem. Over last weekend I made a new bottom for the cutlery drawer box from some 12mm WBP ply and gave it a couple of coats of varnish to seal the wood this enabled me to be able to assemble the drawer box.  I had no idea how the original drawer was installed all I had was an empty space so this was going to be a make it up as you go along job and the drawer box would be the starting point.


Drawer box with ply bottom

The next stage was to epoxy in a piece of hardwood across the opening this has two functions one to support the mounting for the drawer and the second to provide a mounting for the door catches once this was clamped up waiting for the epoxy to cure I filled in the cut out at the bottom of the opening using an offcut of GRP flat bar which was left over from a previous project, I have lots of offcuts of various materials and just occasionally they can be useful. The piece of bar was secured with some thickened epoxy and clamped in place.


Opening showing cut out at the bottom

Once the epoxy had cured I reinforced the hardwood with some woven mat strips and epoxy and the infill piece at the bottom was reinforced at the back with some chopped strand mat and epoxy. Once the epoxy had cured I cleaned up the GRP work and sanded the front face of the infill piece until it was flush the whole of the front of this moulding will be finished with a couple more coats of gelcoat this will also cover some areas that I had sanded through previously when I re coated the whole galley moulding.


Infill piece after sanding

I spent the rest of the day today making up the two side pieces which will support the drawer runners the WBP ply that I used has some voids in it so I have epoxied the raw edges and worked some thickened epoxy into the couple of voids that have shown up.


Two side pieces after epoxying the edges

This weekends homework job is to make up the rest of the woodwork the aim is to get the drawer and the dummy drawer front in place and then line up the doors to them as the drawer fronts will be the most difficult to align and fit.




Friday, 23 November 2018

More paint

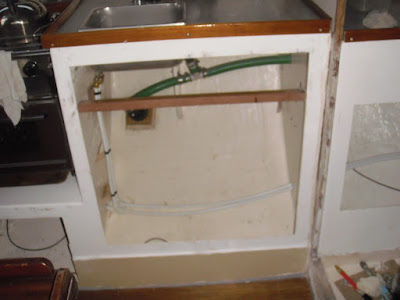
The weather was pretty cold and damp for the start of the week certainly not fit for external painting so I spent some time inside looking at the galley lockers under the sink at present there is just a gaping hole.


Under the sink

The first item is a cutlery drawer I didn't particularly want to build a drawer from scratch so after looking around I found a basic drawer box on the B&Q website they are supposed to be manufactured from stainless steel but as they are powder coated I can't tell but for ten quid can't complain. The bottom of the drawer box is best chipboard but this will be easy to replace with a piece of 12mm WBP ply.


B&Q drawer box

The front of the drawer will be matched to the locker doors I was thinking of using the same solid laminate that I used for the worktops but it is expensive and I would have a lot left over so I am thinking of using plywood painted white with a varnished hardwood edging.

On Wednesday the weather was dry enough to finish sanding the starboard side cockpit benches much too cold and damp for painting but at least a little progress was made.

Today the weather was dry and warm enough for painting and to make sure I ran the engine for a while to warm things up a bit. After masking up the starboard side cockpit benches and the aft cabin roof I gave both areas a good coat of non slip deck paint. The rest of the decks require repainting but that will probably have to wait until the spring.


Aft cabin roof


Cockpit benches looking much smarter


Friday, 16 November 2018

Finally got some paint on

The weather was looking favourable this week for painting the tops of the cockpit benches with non slip deck paint, as the instructions recommend 3 or 4 days before walking on the newly applied paint I decided to do the job in two halves. I began by sanding the port side benches together with the aft cabin roof and the two areas under the spray hood and after washing down left the whole lot to dry.

The first thing Wednesday I gave all the areas a wipe down with a damp cloth to remove any dirt and left it all to dry in the bright sunshine. Once everything was dry I masked up the port benches and the two areas under the spray hood this took quite some time especially as all the corners required a radius to be cut in the masking tape I used a Stanley knife and cut round some new Jubilee clips as they were easily adjusted to the required radius. Once the masking was complete I applied a good coat of International deck paint using a brush to stipple it on and then while the paint was still wet I removed the masking tape.


Port side cockpit

Today I had planned to sand the starboard side cockpit benches and the various bits of gelcoat repair on that side so that I would be ready to mask up and paint on Monday however best laid plans and all that today dawned miserable, wet and foggy and remained so all day so I had to be content with pottering around inside, I removed the inboard folding leaf from the saloon table as it was not really a lot of use and always seemed to be in the way. I removed the fiddle rail and transferred it to the table top in the same way as I had previously treated the outboard side of the table. I spent the rest of the day having a bit of a clean up and thinking about various locker doors in the heads. saloon and aft cabin I am thinking of making them from the same solid laminate that I used for the worktops in these areas however to buy a piece large enough to do all the doors and a cutlery draws will leave quite a substantial piece left over so at the moment the jury is still out on this. I was just packing up for the day when I noticed this group of starlings on the rigging of a boat on the other side of the creek I am glad it's not my boat underneath them.


 It reminds me of the boys manning the mast at the Royal Navy training base at Shotley if you look closely there is a 'button' bird sitting on the masthead lamp.

Friday, 9 November 2018

Plastic teak

This will be a bit of a short post as I did not get the plastic teak panels made up over last weekend as a garden project got in the way however on Monday morning I made a start with the panel for the aft companionway entrance.this was followed up by the forward panel on Wednesday. The fake teak is manufactured from Upvc I have been using 50mm wide tongue and groove strip which has the caulking moulded on. I started with the centre section which is glued together with solvent cement.


Centre section for aft companionway

The centre section was then cut to width. The caulking was then added all around the centre section using a top hat section material.


Caulking material

To form the outside edge pieces I removed the caulking and the tongue from some more of the strip and sanded a radius on the outside edge, the material is available with a rounded edge and without the caulking but as I was using existing stock it was not worth buying any for the small amount needed., The edging was then glued in place with the solvent cement.


Completed aft companionway panel

The completed panel does not lay flat as the pieces were cut from a roll I did put some weight on it and left it for a while and it does eventually flatten out but if left long enough it seems to have a bit of a memory and it will try and return to the original curve. After giving both areas a good sanding with some 40 grit paper to give the adhesive a bit of a key the back of the panels and the GRP were given a good clean with acetone and the panels glued down with Sabatak, black sticky stuff supplied with the fake teak, and then weighed down to allow the adhesive to cure. I used masking tape to prevent the adhesive from spreading beyond the panels.


Aft companionway


Aft companionway

On Monday morning I shall cut round the panels with a Stanley knife and remove the masking tape. It doesn't show in the photographs but the aft panel is made from Tek Dek the forward panel is Dek King they are almost the same bar the dovetail slots on the back which are slightly different sizes also the colour is slightly different as the panels are not adjacent it's not enough to show and after they have been weathered.


Friday, 2 November 2018

Winter on the way

The first job this week was to put some antifreeze in the engine just as a precaution probably not strictly necessary yet as the boat is still afloat and the sea water nowhere near freezing point yet but now that I have sorted all the minor leaks I may as well make use of its anti corrosion properties as well.

I dug the spray hood out of the garage and fitted it to the frame it has seen very much better days the fabric has gone hard and crispy plus it does not fit very well also it has split in way of the main frame tube. After playing around with it for some time I managed to get a reasonable fit but it is definitely a candidate for replacement. The stainless steel frame however is in reasonable condition and will be reused.


Spray hood

I have spent the rest of this week working on sanding the various gelcoat repairs. I have been giving some thought to the non slip areas of the cockpit which I had decided to paint with non slip paint however the two companionway entrance areas will be subject to concentrated wear which will probably mean that the paint will wear through fairly quickly I had been considering Treadmaster again however I have some plastic teak left over from work on previous boats so this weekends homework job will be to make up two panels for these areas.


Saloon companionway


Aft cabin companionway

The above photographs show where the original Treadmaster was glued the plastic teak panels will be of a similar size.