While the epoxy was curing I cut out a timber stiffener to be glassed under the top of the galley moulding the idea was to make said moulding a bit more rigid and hopefully level up the top. The timber was bedded in with some thickened epoxy and held in place with a couple of screws through the top the epoxy that was squeezed out was formed into fillet all round this was then left to cure.
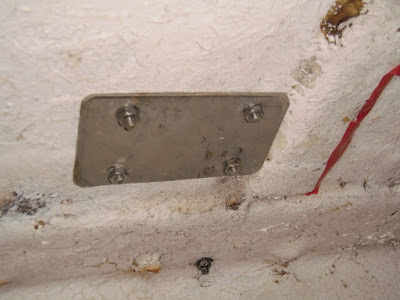
While I had some thickened epoxy mixed I got on with another little job which has been needing doing for some time the starboard midships cleat I had put both the port and starboard cleats on quite early on in the project and afterwards I identified what I took to be the backing plates in amongst all the other bits and pieces. I had fitted the port side plate some time ago but I was not happy with the starboard side as can be seen from the following photograph the two bolts to the right are in way of the deck stiffener such that they are splayed out and it is impossible to get the nuts up square to the underside of the deck but at the rime the main aim had been to seal the holes in the deck to keep the rain out.
Bolts for starboard midships cleat
After removing the cleat I decided to move it forward so that I could utilise two of the original bolt holes I then marked and drilled two new holes and secured the cleat and backing plate the two redundant holes were filled with some thickened epoxy.
Starboard midships cleat backing plate
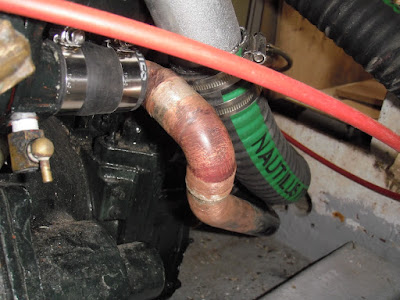
On Tuesday I spent some time at home in the workshop and silver soldered the modified engine sea water pipe ready to fit.
Sea water pipe completed
The sea water pipe was fitted on Wednesday it is now complete except for a coat of green Hammerite to match the rest of the engine.
Modified sea water pipe fitted to the engine
The next task was to finish glassing in the reinforcement to the galley moulding I used a couple of layers of 100mm woven glass fibre tape and epoxy resin such that the timber was completely encapsulated.
Galley moulding reinforcement
The top of the moulding is now much more rigid and a lot closer to being reasonably flat apart from a bit at the back under the lockers but to do anything with this area would entail grinding out the tabbing which secures the moulding to the half bulkhead and the hull and then levelling up the top and refixing it, but as the worktop is 12mm thick solid laminate which is pretty rigid and most of the top is pretty level particularly in way of the sink and taps I decided that it would be good enough.
Today I ran in the waste pipe which connects the heads washbasin waste, the discharge from the shower drain pump and the galley sink waste to the sea cock as shown in the above photograph the tee is for the connection to the galley sink waste it still requires some jubilee clips to complete but I have run out at the moment I also need the galley sink and a hose tail to connect the hose to the heads washbasin waste I shall get these on order this weekend.
Shower drain pump connection
To finish up today I removed the starboard chain plates so that I could reseal them while there was a minor leak on the port chain plates the starboard ones were OK however at the moment they are easy to get at but once the internal refit is completed the job will be a little more awkward and sods law usually says if I don't do them now once I get the boat sailing things are bound to work a bit and they will then start leaking. I cleaned everything up and washed with acetone before applying a generous dollop of Sikaflex and then lowered the plates in and bolted them back to the bulkheads and then fitted the deck plates and pulled them down until the Sikaflex was starting to be squeezed out once it has cured I will harden up the screws in the deck plates.
Chain plates ready to be replaced
Sikaflex being squeezed out round the deck plates


No comments:
Post a Comment