Friday 20 December 2019

Heater installation

This week I have made a start on the prep work for the heater installation, the first task was to seal up a number of redundant openings between the void space and the engine space, the largest being about 32mm diameter I cut out a plywood disk with a hole saw and sealed it in place with some thickened epoxy the remaining couple of holes were only small so they were filled with thickened epoxy. The plan is to take the air supply to the heater from the void space which has a direct connection to the saloon above the head lining in the quarter berth, this should hopefully give a re-circulatory air flow with sufficient fresh air make up via the dorade vents in the saloon to prevent condensation. I then moved on to cutting the openings in the various bulkheads for the hot air duct work using a 92mm hole saw, there are several of these openings that had to be cut blind particularly those behind the up stand in the quarter berth and the one to the aft cabin.


Two openings formed under the galley sink

I have shown a couple of the openings these are the ones that can be seen. That will be about all until after Christmas and I have obtained the necessary kit for the installation so I wish you all the seasons greetings, or bah humbug, depending on your views on the festivities.

Friday 13 December 2019

Further thoughts on the heater

The first job this week was to finish off the cable duct in the quarter berth I cut some 12mm plywood, I used 12mm as I had some available, and then after fitting it between the two bulkheads I covered it with lining carpet and screwed it into place.


Cable duct through quarter berth

Now that I have more or less decided on the heater installation I spent today finalising the route for the hot air duct work. As previously noted the heater will be installed in the void space at the aft end of the quarter berth in a port/starboard orientation the hot air outlet will connect to a tee so that the duct work can be led aft to the aft cabin and forward to the saloon, heads and forward cabin. The duct to the aft cabin will go through an opening to be formed in the aft bulkhead of the void space through into the under bunk space and then connect to the air terminal fitted in the redundant engine exhaust opening.


Redundant exhaust opening

The duct will come through the bulkhead in the space between the inner moulding and the hull approximately in the centre of the photograph below


The duct work going forward will be installed behind the up stand in the quarter berth inner moulding which can be accessed from the void space, I used a piece of 90mm diameter HDPE to check that the duct will fit. This will conveniently take the duct clear of the water tanks installed in the two aft under bunk spaces.


Up stand in quarter berth below the timber panel


Access to space behind the up stand

A branch will run to the saloon hot air outlet terminal through the forward under bunk space in the quarter berth, the terminal will be just above sole level


Forward under bunk space

The duct will then continue through the space below the cooker into the locker area under the galley sink, I spent quite some time checking on the positions of the openings to ensure that there was adequate clearance from the gas pipe and other fittings in these areas.


Forward under bunk area the cross marks the position of the opening for the duct


Space under the cooker duct will run outboard of the timber gas pipe protector

Once in the under sink locker the duct will run forward and through to the under sink locker in the heads.


The cross marks the position of the opening for the duct


Cross marks the position of the opening through to the heads locker

The duct will then run through the heads locker with a branch to connect to the hot air terminal mounted just above the sole.


Access to the heads locker will be below the shower drain pump


The cross marks the position of the opening through to the forward cabin

From the heads locker the duct will run forward into the under bunk area on the port side of the forward cabin where it will terminate with a hot air terminal just above the cabin sole. At the moment the timber support will take a plastic storage box and a case of beer one of these may have to go to allow the duct through. This post is a bit of a ramble but it is a convenient way of recording my thoughts. Now that I have an installation plan it's just a case of ordering the heater and all the ancillaries and installing it probably after Christmas.


Friday 6 December 2019

Further thoughts on the heater

I made up and fitted the edge trim for the door to the void space at the aft end of the quarter berth and during the week I completed the varnishing of the trim and applied a second coat of gloss paint to the bulkhead.


Door completed


Bulkhead painted

The next task was to attach the door and then fit and adjust the latch.


Door complete

I spent some time carrying out further investigation into the heater installation, I spoke to Planar's British branch re the length of duct required to heat all spaces throughout the boat bearing in mind the 5 metre limit on duct length. The person that I spoke to seemed to think that there will not be a problem he was apparently well acquainted with the Moody 33. I then went through and measured the duct work required for the installation of the heater in the steering gear space, this would require approximately 10 metres of 90mm flexible duct in all to get right through to the forward cabin. This was well in excess of the stated 5 metre maximum length so I started to look at plan 'B' which is to install the heater in the void space at the aft end of the quarter berth, after carefully measuring I found that only 7.5 metres of flexible duct will be required which is a considerable saving in length as well as saving some money. My only concern is that the heater exhaust will exit through the side of the boat and I have heard of cases of melted fenders or fender lines hence the original plan to install the heater aft and exhaust through the transom. I will probably go with plan 'B' I will just need to be careful when placing fenders and rafting up.

I finished up the week by starting to make cable duct through the quarter berth to cover up the cables that run through it, it should also cover a bit of a gap between the aft bulkhead and the cockpit side it will be nothing more than some plywood covered in the lining carpet to match the existing lining.


Cable to be enclosed note the gap between bulkhead and cockpit side


Friday 29 November 2019

The final door

The first task this week was a bit of housekeeping now that work in the aft cabin is complete for the time being I brought the hoover down and gave it a good clean to get rid of all the dust etc emanating from the previous weeks woodwork.

Last weekend I sanded and primed the door for the void space around the gas locker and during the week I managed to get two coats of gloss paint on each side it just needs the edge trim to be made and fitted together with the hinges and latch.


Door awaiting trim

The paint was peeling badly from the bulkhead at the aft end of the quarter berth I think that it had been applied directly to the original veneered finish I don't know what the said veneer was finished with so I gave it a good sanding before applying primer/undercoat and then the first coat of gloss white paint.


Bulkhead after first coat of gloss

The aim this weekend is to make up and fit the edge trim to the door, so that once I have applied a second coat of gloss to the bulkhead next week, it should be ready to fit, this has been door number nine. Leyland white high gloss trade paint has been used for all the internal gloss work a 2.5 litre tin can be had from Screwfix for about fifteen quid and it is nice paint to use and seems to cope with the current spell of chilly weather, I think that the recent problem with the aft cabin doors was more due to old dregs of paint at the bottom of the tin, since then I have bought a fresh tin and it has gone on with no problems.


Friday 22 November 2019

Aft cabin almost done

The main aim this week was to get as far as possible with the aft cabin using materials that I had in stock. Over the weekend I had sorted the paint finish on the two remaining doors  by sanding them back and applying a further coat which has made them much more presentable and also cleaned up the bulkhead piece for the lockers. I began on Monday by fitting the two shelves and the bulkhead. I then finished up the day by looking into the installation of a diesel fired heater, it looks as though the heater will go into the steering gear space with the hot air duct running down the port side, my only concern is the length of duct, I am planning to use one of those Russian Planar units possibly their 4 KW model and apparently the maximum duct length is 5 meters I shall contact them for confirmation next week. For the remainder of the week I have been finishing off the starboard side lockers by fitting the forward front panel and the hardwood cover strip over the join between the two panels and then once this was complete I cut out and fitted the laminate corner trim pieces for the forward bulkhead in a similar manner as those for the saloon. forward cabin and the heads


Port side corner trim


Starboard side 

That is about is about as far as I can go in the aft cabin until I can sort the rest of the trim and find a suitable mirror.


Friday 15 November 2019

Trip to the sailmaker

The first task on Monday morning was to pick up the sails from the boat and deliver them to Wilkinsons sailmakers in Faversham to have them washed, the UV strip on the genoa renewed and any minor repairs carried out as necessary. over the weekend I had cut out the piywood for the shelves in the aft cabin lockers so on return from the sailmakers I set to and started shaping the shelves  for the port side, as I had already secured the aft locker front panel it meant removing the forward panel and working in from the end which turned out to be fairly easy. Also I had repainted the doors over the weekend and six of them turned out to be satisfactory leaving two that I will have to sand back again and repaint. Once the two shelves had been fitted to the port side I inserted the doors into the aft panel and then fitted the bulkhead between the forward and aft panels.


Shelves and doors to aft panel in place

Then I inserted the doors into the forward panel and then secured it into position followed by the cover strip over the join between the two panels to finally complete the port side some hardwood trim will be required, I have some but probably not enough to complete the job I will probably need to obtain some more I will wait and see what is left of my dwindling stock.


Port side

To finish off the week I made a start on the starboard side, I managed to mark out the aft shelf but then along came the wind and the rain which brought a halt to the proceedings for the day. Over the weekend I will try and sort out the paint finish on the remaining two doors and clean up the bulkhead for the starboard side.


Friday 8 November 2019

Aft cabin continued

There is not a lot to write about this week the main aim has been to finish sanding and then painting the locker doors I have got as far as the second coat of gloss paint, however the second coat is anything but gloss whether or not the weather was too cold overnight or not I don't know I shall give the doors a sanding and try again. I have masked up and varnished the door opening trim on the two forward front panels I had done the aft panels some time ago but then run out of varnish.


Door trim masked and varnished

I finished up this week by taken the sails off ready to go to the sailmakers for laundering and servicing, the UV sacrificial strip on the genoa is falling apart and requires replacing. The sails are getting on in years particularly the mainsail but it should have another season or two in it. I have ordered some more plywood so the plan this weekend is to rough out the shelves for the aft cabin so that I can fit them next week.


Friday 1 November 2019

Back to the aft cabin

The aft cabin was largely complete there were just a few bits and pieces to finish off the first being the doors to the lockers there are eight in total each one covered on both sides with the same veneer with the foil backing as used elsewhere. The veneer on the inside was beginning to peel off so I stripped the inside faces of all eight doors with the idea of painting them white and then turning them round so that the white face is to the front. The hardest part of this job is getting rid of the contact adhesive, so far I have only stripped four of the doors with a combination of scraping with a tungsten carbide scraper and sanding with 60 grit paper. I did put one of the doors back with the original veneered face to the front to see how it looked, the back will still need cleaning up and painting so I will continue and then make the decision before I finally fit the doors.


Locker door in original finish

There is a small bulkhead halfway along each locker which was originally veneered and then sprayed with that red flock finish used at the time I think that the spray gun was poked in through each door and waved around judging by the finish, these are in the process of being stripped and cleaned up, more contact adhesive to remove.


Bulkhead in the process of being stripped

Also this week I have secured the lining panel which covers the aft end of the cabin this has just been screwed to a couple of wooden blocks which have been secured to the locker front panels, also the shelf which runs across the aft end of the cabin has been secured again with a couple of wooden blocks fixed to the locker front panels.


Aft lining panel and shelf secured in place

Apart from finishing the locker doors the lockers require shelves and some trim pieces for the front panels, I have the first piece in place as can be seen on the left side of the lower photograph above. Originally I believe that there was a mirror mounted below the transverse shelf the plan is to eventually obtain a replacement.


Friday 25 October 2019

Not a lot to report

The main aim this week was to go for a days sailing today but as the week went on it was looking more and more unlikely as the weather forecast continued to deteriorate. I have spent this week pottering about with minor detail stuff, the first job was to complete the trim round the enclosure to the rear of the chart plotter, I also decided to put in an additional piece where the enclosure abuts the bulkhead.


Enclosure complete

I had been thinking about getting the boat lifted out and scrubbed but unfortunately the marina hard standing is fully booked for this year so it will have to wait for the spring when space becomes available, there is an upside to this in that scrubbing the bottom and antifouling, never a pleasant job, is a little more bearable once the weather warms up a bit. I did paint some marks on the shear strake to indicate the lifting strop positions ready for the lift out. I did dig out the lee clothes for the forward cabin and give them a clean up they had a few rust stains as well as being generally dirty so a dose of the yellow stain remover, aka oxalic acid, has made a great improvement. That is about it for this week other than drinking tea and chatting, that is the trouble with boatyards they can be terribly social places.

Friday 18 October 2019

Odd jobs

The main priority this week was to complete the enclosure for the rear of the chart plotter, I started by completing the varnishing of the timber trim and then fitting it. I decided to use timber trim for the outboard end of the enclosure and the first part has been completed and fitted, over the weekend I shall cut the timber for the lower section this will have to be cut from a larger section to give the required width.


Enclosure almost complete

While I was waiting for the varnish to dry I made and fitted the fairing piece to the starboard aft corner of the coach roof in the same manner as the two forward corners.


Fairing piece fitted


Reading lamp replaced

To finish off the week I got the hoover out and gave the saloon a good clean, the work that I had been doing entailed cutting and shaping timber and laminate and drilling for fixings which seems to have left behind a fair amount of detritus which gets everywhere especially the dust its all looking much cleaner now.

As most of the major projects have been completed the work rate has reduced as I settle into what is mostly detailing and finishing off the aim is to have the majority of this work completed over the coming winter although of course I have had the boat long enough now for various maintenance jobs to crop up from time to time.


Friday 11 October 2019

Still back of the chart plotter

Over last weekend I finished the access door and varnished the edge trim so that on Monday morning I could fit the door and the latch. Also I roughed out some teak for the edge trim around the enclosure ready for final fitting.


Example of the teak from cockpit gratings

The first job this week was to fit the door to the enclosure and then fit and adjust the latch this was made easier because I could remove the enclosure and work from the back. Once the door had been fitted I went on to replace the enclosure before finalising the edge trim I also cut some trim to fit around the top of the enclosure, this was cut from some of the original trim which came with the boat. The edge trim was then fitted and given its first coat of varnish.


View showing edge trim and door fitted

I still have to finalise the edge trim for the outboard side of the enclosure, the bottom section needs to be wider so I will have to go through my stock of used teak. The trim for the top of the enclosure was also given its first coat of varnish, this will be fitted once the varnishing is complete.


The top trim after the first coat of varnish

To my mind the door looks a little on the heavy side, it is made in the same manner as all the other locker doors on the boat but being much smaller leads to it looking a bit on the heavy side particularly the hinges. Also I haven't made up my mind whether or not to put a piece of trim over the junction of the two laminate panels just below the door, I shall give it some thought over the next week or so. This has been another of those short posts that seems which does not seem to reflect the amount of work involved in forming the trim from the old grating parts and its subsequent fitting, woodwork is not my strong point having been trained in iron fighting however I am fairly satisfied with the work so far.


Friday 4 October 2019

Back of the chart plotter again

I had originally planned to sail across to the Walton Backwaters this week but by last Sunday the weather was looking decidedly poor with the remnants of hurricane Lorenzo being forecast to be affecting the weather by the end of the week so the plan was cancelled. I did manage a brief trip down the Swale on Monday afternoon, there was only a light breeze, in reality I could have probably got to Walton on Monday and returned today or tomorrow.

Anyhow back to work over last weekend I cut out the opening for the door in the enclosure and cut the edge trim for the door and then painted the back of the door so that it is now ready for final assembly. On Wednesday I did a final fit of the enclosure and then epoxied some wooden blocks to the bulkhead to support the enclosure.

The first task today was to remove the redundant Stowe echo sounder unit from the cockpit bulkhead, I had replaced it with a NASA unit as the Stowe transducer did not seem capable of operating from inside the boat, I then cut out a blank to cover the opening in the bulkhead. I have been thinking of utilising this opening possibly for an extension speaker for the VHF so the blank is sort of semi temporary at the moment its main purpose is to keep out the rain.


Echo sounder opening blanked off

The next move was secure the enclosure to the wooden blocks with screws so that it can be easily removed if required.


Enclosure secured in place

All that is required now is to make up some hardwood trim for the enclosure similar to that already fitted in the saloon, I still have some of the old teak from the cockpit benches on Shuda, my last boat, hopefully there will be enough and then finish off the assembly of the door


Friday 27 September 2019

Back of the chart plotter

I have spent this week making up the enclosure for the rear of the chart plotter, I cut out the ply and epoxied the whole thing together again I have been using materials that I have to hand the ply is some 4mm WBP that I had left from the headlining project but as it will be covered with laminate which is 4mm thick it should be sufficiently rigid, the framing is left over merenti hardwood from the heads door frames.


Reverse side of enclosure


Laminate applied


Final piece of laminate applied

The laminate still needs to be faired round the edges so that the enclosure is a snug fit, also the opening for the access door needs to be cut out this will be this weekends homework job along with finishing off the door, I have cut out the hockey stick section edge trim it just needs staining and varnishing and the door hardware fitted.

This has been a bit of a short post which doesn't reflect the work done on the enclosure cutting and fitting to the structure of the boat which is neither straight nor square which can be somewhat time consuming


Friday 20 September 2019

Enclosing the back of the plotter

The first job on Monday morning was to fit the last piece of corner trim in the forward cabin I had roughed it out over the weekend so it just took a little bit of final fitting.


The final piece on the starboard side

After the final piece of trim was fitted there was time to potter off down the creek for a couple of hours, there was not a lot of wind but I managed to drift down as far as the entrance to Milton Creek, unfortunately the County Council built a new road bridge across the entrance with a fixed bridge so the only access is for motor boats these days.

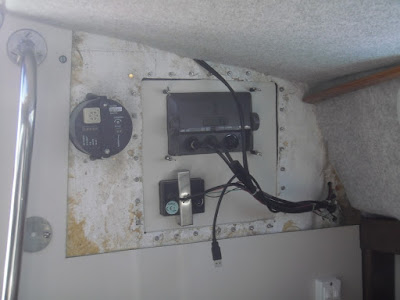
The next project is to tidy up the back of the cockpit bulkhead in way of the chart plotter etc. It has been one of those jobs I have been meaning to get stuck into for some time as one of my pet hates is yards of exposed cabling.


Back of the cockpit bulkhead

The plan is to build an enclosure around the area with a hinged access door, the door will be the same pattern as the other recently completed locker doors. The enclosure will be built in ply lined with some of the laminate used on the rest of the bulkheads etc. Over the last weekend I sorted through my stock of ply and laminate etc and found sufficient for the job, so for the remainder of this week I have been putting some of the pieces together.


First piece of the enclosure

The original reason for the chamfer at the bottom of the enclosure was that I didn't have a large enough piece of laminate to line the whole front, this was one of the reasons I hadn't done anything with this job I was still thinking of a way round the shortage of material, it finally came to me over the weekend. The chamfer also has the advantage that it will make the enclosure much less obtrusive. I have cut and shaped the piece of ply for the bottom edge of the enclosure and over the weekend the homework job will be to get some of the pieces assembled


Friday 13 September 2019

Bum straps and corner trim

I started this week by finishing the lower corner trim for the port side aft in the forward cabin and then cutting and fitting the piece for the starboard side.


Starboard side


Port side

I went to the chandlers on Monday to pick up some Y10 cleaner, which is effectively oxalic acid mixed with a jelly like substance to return it in place while it does its stuff. I have two bum straps for the chart table and the galley, these provide some support at the chart table and the galley especially when on port tack, unfortunately they were both heavily rust stained and the plan was to use the Y10 to remove the stains unfortunately the local chandler was fresh out of Y10 but he had an alternative which is probably very similar.


Alternative to Y10


Rust staining

I applied the stain remover as instructed and left for an hour, while working on the corner pieces, the first application removed the lighter staining but the heavier staining required several applications to remove it all but on the whole the straps came up pretty well and after a good wash off they look quite presentable


Rust stains removed

To finish off this week I started on the trim pieces for the forward end of the forward cabin, the bulkhead here is not a pretty sight.


Port side forward bulkhead

I managed to cut out and fit the trim piece for the port side which now much improves this area, which just leaves the starboard side I have marked out the laminate for this area and will cut out over the weekend ready for fitting next week.


Port side forward

Unfortunately the forward bulkhead is painted as I had run out of laminate, I have made the trim from odd offcuts of laminate as in other areas hence the difference in colour.